Overview
Correction of the nasal tip is one of the most challenging aspects of rhinoplasty surgery, requiring the surgeon's ingenuity and flexibility. A study from the European Academy of Facial Plastic Surgery found that out of more than 41,000 rhinoplasties, performed in 33 countries, dissatisfaction with the nasal tip was one of the three most frequently reported indications for revision surgery, along with dorsal asymmetry and nasal blockage. Five percent of primary rhinoplasties in the study and 1% of secondary rhinoplasties underwent revision surgery. [1]
Every surgeon should master several techniques to modify the nasal tip, and tip modifications should be performed before alterations to the nasal hump are made. [2, 3, 4, 5, 6, 7] This sequence of surgery has been found to be advantageous because the removal of cartilage from the nasal tip that defines the tip also decreases nasal tip projection. Once the cephalad border of lower lateral cartilages is removed, the surgeon can perform nasal hump reduction by merely lowering the nasal dorsum to accommodate the new nasal tip projection. [8]
The two basic endonasal approaches to remodeling the tip cartilage are the intracartilaginous and infracartilaginous approaches. The intracartilaginous approach is the author's favored technique to produce a nasal profile in which the nasal tip stands out approximately 2 mm from the dorsal bridge line. This endonasal operation is unquestionably useful in managing the nasal tip in both primary and secondary rhinoplasty. The surgeon sees the result immediately. This approach involves good visualization, less edema, and no vascular issues that may interfere with the surgeon’s ability to evaluate the final result.
Anesthesia
See the list below:
-
Local anesthesia for tip surgery is used more for the hemostatic effect (epinephrine) than the regional block (lidocaine) that circumferentially interrupts all the neural pathways to the nasal tip and bridge (see section A of the image below).
 Anesthesia for tip surgery is a regional block that circumferentially interrupts all the normal pathways to the nasal tip and bridge. (A) The highlighted area represents the area of the nasal bridge and nasal tip into which lidocaine is not injected. (B) For administration of the anesthetic, a 25-gauge needle and 5-mL syringe is inserted until bone is felt and directed cephalad. The injection is given as the needle is withdrawn. (C) The needle is then directed caudally and again the injection is given upon withdrawal, with the needle always positioned over the periosteum. (D) Next, the area of the infraorbital foramen is injected.
-
Most of the authors' patients who have primary or secondary rhinoplasty undergo general anesthesia, making the need for local anesthesia much less necessary. The general anesthesia used is deep intravenous sedation with a controlled airway. Fentanyl, midazolam, and propofol are used to control consciousness, and an endotracheal tube secures the airway and allows the delivery of oxygen. General anesthesia requires an anesthesiologist.
-
The highlighted area in the image above represents the area of the nasal bridge and nasal tip into which local anesthesia is not injected. To prevent distortion of the nasal bridge or tip, refrain from injecting directly into the operative field. As the lower lateral cartilages and dorsal hump area are modified, the surgeon can immediately assess the profile and nasal tip definition in progress. The author believes that the aesthetic surgeon is a surgical sculptor. To obtain the best, most predictable, and most accurate results, the surgeon needs to see the results immediately.
-
For administration of the anesthetic, the authors use a 25-gauge needle and 5-mL syringe. Insert the needle until bone is felt and direct it cephalad (see section B of the image above). The surgeon injects the local anesthesia as the needle is withdrawn. The needle is then directed caudally (see section C of the image above) to inject the area of the infraorbital foramen (see section D of the image above), the base of the alar rim, and the area of the piriform fossa (see section B of the image below). Inject a very small amount of local anesthetic to the proposed intercartilaginous line intranasally (see section C of the image below). Before beginning surgery, wait a minimum of 10 minutes for the local anesthesia to take its full effect.
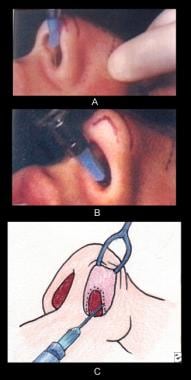 Anesthesia for tip surgery. (A) The area of the base of the alar rim is injected. (B) The intranasal block begins with an injection in the area of the piriform fossa. (C) The intercartilaginous line is injected intranasally.


Technique
See the list below:
-
The intracartilaginous technique is the most precise method to produce nasal tip definition and a profile in which the nasal tip stands out gracefully from the dorsal bridge line, with good nasal tip projection and sufficient supratip break. The nasal tip should project approximately 2-3 mm beyond the nasal bridge. Remember that the initial local infiltration of anesthesia does not distort the tip or the bridge; thus, the results of surgery on these areas are immediately observed.
-
Examination of the patient should include profile and frontal views to determine the plan for surgery. The authors take 7 photographs for the operating room (2 frontal and 4 lateral in repose and smiling, with 1 worm's eye view). Always mount the photographs in the operating room so that they can be used for reference during the procedure.
Preparation and marking for tip surgery
See the list below:
-
When the patient has been prepared for surgery, examine the nose carefully. Palpate the cartilaginous structures. As Gustav Aufricht once told Dr. George Peck Sr., "not only must we study the nasal and facial lines, we must feel the nose and put the feel of the nose into our fingers."
-
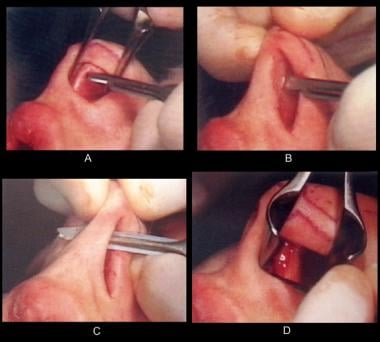
Palpate the caudal borders of the lower lateral cartilage, and use a skin marking pencil to outline those borders on the external skin (see image below).
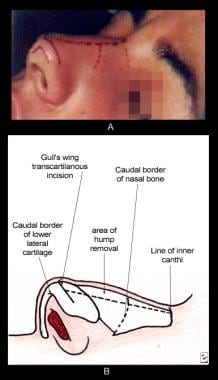
 Preparation and marking for tip surgery. The caudal borders of the lower lateral cartilage are palpated, and, using a skin marking pencil, those borders are outlined on the external skin. The intercartilaginous incision, which resembles a gull's wing, is next outlined on the external skin.
-
The intracartilaginous incision (see section B of the image below), which resembles a gull's wing, is next outlined on the external skin (see section A of the image below).
-
In most patients, the author elects to leave a caudal margin of lower lateral cartilage that measures approximately 6 mm. The exact amount of lower lateral cartilage removed is not important; the amount of remaining cartilage is important. The integrity of the lower later cartilage must remain intact to prevent notching or nasal wall collapse. The surgeon must remove enough cephalad lower lateral cartilage to create nasal tip definition while maintaining the integrity of the lower lateral cartilages.

Lower lateral cartilage surgery
Nasal tip technique
-
Place the suction tip intranasally in the dome area beneath the sculpturing line that has been drawn on the external skin (see sections A and B of the image below). An imprint is created by applying pressure with the middle finger of the opposite hand against the tip of the suction (see section C of the image below). This imprint, which is merely a guide, marks the intracartilaginous (sculpturing) line that initially had been drawn on the external skin.
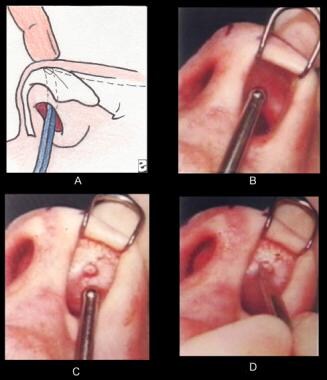 (A-B) The suction tip is placed intranasally in the dome area beneath the sculpturing line that has been drawn on the external skin. (C) An imprint is created by applying pressure with the middle finger of the opposite hand against the tip of the suction. This imprint, which is merely a guide, marks the intracartilaginous (sculpturing) line that initially had been drawn on the external skin. (D) Using a No. 15 blade, the incision is begun at the imprint.
-
Using a No. 15 blade scalpel, begin the incision at the imprint and extend it laterally, always parallel to the alar rim margin (see section D of the image above and section A of the image below). As the alar rim edge is everted with the double hook, always identify the caudal border of the lower lateral cartilage to be sure that sufficient width of cartilage is left. The lower edge of the cartilage is easy to see because it bulges through the vestibular skin as the alar rim is everted. This edge also serves as a guide for the removal of lower lateral cartilage. Leaving a generous width of cartilage is always better than removing too much cartilage, as it is easy to trim more cartilage, if necessary. Carry the incision medially and laterally, always staying parallel to the alar rim (see section B of the image below). Section C of the image below diagrammatically shows the extent of the sculpturing incision.
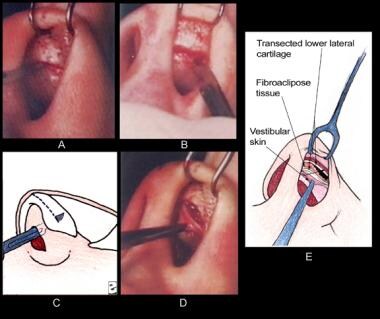 Nasal tip technique. (A) Using a No. 15 blade, the incision, begun at the imprint, is extended laterally, always parallel to the alar rim margin. (B) The incision is carried medially and laterally, always staying parallel to the alar rim. (C) The extent of the sculpturing incision depicted diagrammatically. (D) A mosquito hemostat is used to grasp the vestibular skin. By pulling downward, it is possible to expose the cephalad portion of lower lateral cartilage and the contiguous fibroadipose tissue between the skin and the cartilage. (E) This exposed area represents the cartilage and fat that will be removed.
-
A mosquito hemostat is used to grasp the vestibular skin. Pulling downward exposes the cephalad portion of lower lateral cartilage and the contiguous fibroadipose tissue between the skin and the cartilage (see section D of the image above). This exposed area represents the cartilage and fat that will be removed (see section E of the image above). After the incision has been made, undermine the skin from the fibroadipose tissue and cartilage, especially in the central supratip area (see section A of the image below).
 Nasal tip technique. (A) After the incision has been made, the skin is undermined from the fibroadipose tissue and cartilage, especially in the central supratip area. (B) A histologic specimen taken through the cartilage and other tissue of the dome area. The fibrous fatty nature of this tissue is evident. (C-F) While the vestibular skin is held with a hemostat, the vestibular skin is separated from the intranasal side of the lower intranasal cartilage with sharp dissecting scissors. In (C), the hemostat grasping the vestibular skin is hidden by the sharp pointed scissors. The point of the hemostat is visible through the opened tip of the scissors in (F).
-
Section B of the image above shows a histologic specimen taken through the cartilage and other tissue of the dome area. The fibrofatty nature of this tissue is evident. If this fibroadipose tissue is not removed with the segment of lower lateral cartilage to which it is attached, it will remain in the supratip area and may cause a bump or lack of proper definition.
-
As the skin circumferentially contracts, the fat forms a ball, and supratip fullness appears 2-3 weeks postoperatively. Attempts to reduce this fullness with steroids are risky, as steroids can produce subcutaneous soft tissue atrophy, creating a depression.
-
Holding the vestibular skin with a hemostat, separate the vestibular skin from the intranasal side of the lower intranasal cartilage with sharp dissecting scissors (see sections D and E of the image below). (In section C of the image below, the hemostat grasping the vestibular skin is hidden by the sharp pointed scissors. The point of the hemostat is visible through the opened tip of the scissors in section F of the image below.)
Nasal tip technique. (A) After the incision has been made, the skin is undermined from the fibroadipose tissue and cartilage, especially in the central supratip area. (B) A histologic specimen taken through the cartilage and other tissue of the dome area. The fibrous fatty nature of this tissue is evident. (C-F) While the vestibular skin is held with a hemostat, the vestibular skin is separated from the intranasal side of the lower intranasal cartilage with sharp dissecting scissors. In (C), the hemostat grasping the vestibular skin is hidden by the sharp pointed scissors. The point of the hemostat is visible through the opened tip of the scissors in (F).
-
The dome of the lower lateral cartilage and a pocket that is being developed between the vestibular skin and the cartilage are shown in section A of the image below. In section B of the image below, a hemostat (instrument at right in the photograph) grasps the dome of the lower lateral cartilage, while another hemostat (at left) holds the vestibular skin. The sharp pointed scissors (in the center) are used to dissect the medial portion of the lower lateral cartilage to free it of any attachments.
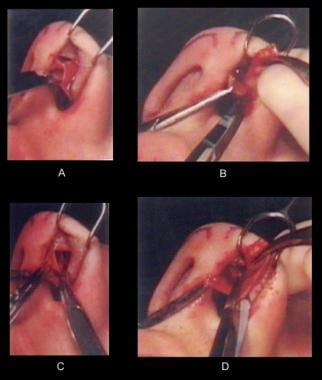 Nasal tip technique. (A) The dome of the lower lateral cartilage and a pocket that is being developed between the vestibular skin and the cartilage are shown. (B) A hemostat (instrument at right in the photograph) grasps the dome of the lower lateral cartilage, while another hemostat (at left) holds the vestibular skin. The sharp pointed scissors (in the center) are used to dissect the medial portion of the lower lateral cartilage to free it of any attachments. (C) Using the tips of the sharp pointed scissors, the vestibular skin is peeled from the lateral intranasal side of the lower lateral cartilage. (D) The scissors are inserted to transect the lateral portion of the lower lateral cartilage.
-
Using the tips of the sharp pointed scissors, peel the vestibular skin from the lateral intranasal side of the lower lateral cartilage (see section C of the image above). Section D of the image above shows the scissors inserted to transect the lateral portion of the lower lateral cartilage.
-
The maneuver is shown in simplified form in section A of the image below. The lower lateral cartilage is then transected (see section A of the image below) and removed (see sections C and D of the images below). The lateral most extent of the lower lateral cartilage is maintained to prevent nasal wall collapse and a depression.
 Nasal tip technique. (A) A simplified form of the scissors inserted to transect the lateral portion of the lower lateral cartilage. (B-D) The lower lateral cartilage is then transected and removed.
-
The specimens of cartilage that are removed are shown in section A of the image below). The attached fibroadipose tissue can be seen at the lower edge of the lower segment of cartilage and the upper edge of the other specimen.
 Nasal tip technique. (A) The specimens of cartilage that have been removed are shown. The attached fibroadipose tissue can be seen at the lower edge of the lower segment of cartilage and the upper edge of the other specimen. (B) The external nasal tip has developed highlighting at the transcartilaginous line. (C) After surgery of the lower lateral cartilages has been completed, an intranasal examination reveals an intact, preserved nasal valve. (D) In another view of the intranasal valve, a suction tip has been placed under the valve tenting it, and preservation of nasal anatomy is evident.
-
Examine the nasal tip externally and note the highlighting that has developed at the intracartilaginous line (see section B of the image above). The sculpturing technique produces a level discrepancy. As light hits the line of demarcation, it creates highlighting at the tip, the highest point, and a shadow or definition in the supratip. If the "gull's wing" sculpturing line has been properly placed, the resulting shadow imparts to the nasal tip the desired aesthetic qualities. A gull wing highlight is a distinguishing characteristic of all defined nasal tips and can be readily appreciated by looking at pictures of models in fashion magazines.
-
At this time, it is of primary importance to understand what has been achieved. The nasal tip has been modified but the continuity of the dome (arch) of the lower lateral cartilage has been preserved. The structural support and skeletal framework of the nasal tip have been left intact.


Joseph technique and derivatives
-
In contrast to the procedures presented above, in the Joseph technique and in techniques that have evolved from that procedure, the philosophy of shaping the nasal tip is based on removal of a portion of lower lateral cartilage and transection of the dome, with a geometric resection in the remaining rim of the lower lateral cartilage. The desired and expected result in the Joseph procedure is the remodeling of the nasal tip when the transected medial and lateral crucial components come together and head into the modified shape. The problem inherent in this technique is that the union between the transected crura is scar tissue, which does not have the rigidity of cartilage.
-
Consequently, in many cases, the procedure resulted in a kinking at the scar and a boxy, asymmetric tip. Occasionally, one or the other of the transected ends of the crura would curl, producing sharp points in the skin. The variables in the Joseph technique are many and unpredictable.
-
The fundamental shortcoming in the Joseph procedure lies in the surgeon's failure to realize the reduction in tip height and the overall reduction in nasal tip pyramid size that occur after reducing volume in the lower lateral cartilages. By preserving the lower lateral domes, the author does not burn any bridges. If a tip is wide or high, the operation can be modified and continued with other techniques that are described later in this article.
Intranasal valve
See the list below:
-
Once the surgery of the lower lateral cartilages has been completed, an intranasal examination reveals an intact, preserved internal nasal valve (see section C of the image below). This structure is essential to normal nasal physiology. Destruction of the intranasal valve leads to symptoms of obstructed breathing in an otherwise clear airway as a direct result of scarring from an intercartilaginous incision. After using this kind of incision for many years, the author has now almost totally replaced it with a more anatomically conforming and less destructive intracartilaginous incision. All surgery on the lower and upper lateral cartilages and bridge can be performed using this simple incision, thus avoiding any intercartilaginous incision.
Nasal tip technique. (A) The specimens of cartilage that have been removed are shown. The attached fibroadipose tissue can be seen at the lower edge of the lower segment of cartilage and the upper edge of the other specimen. (B) The external nasal tip has developed highlighting at the transcartilaginous line. (C) After surgery of the lower lateral cartilages has been completed, an intranasal examination reveals an intact, preserved nasal valve. (D) In another view of the intranasal valve, a suction tip has been placed under the valve tenting it, and preservation of nasal anatomy is evident.
-
Another view of the intranasal valve can be seen in section D of the image above. This suction tip has been placed under the valve tenting it, and preservation of nasal anatomy is evident. Section A of the image below shows the transcartilaginous incision and the nasal valve. Sections B-E of the image below show examples of the terribly scarred intranasal valves.
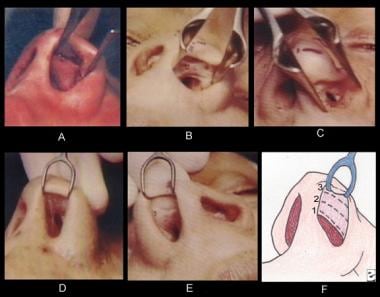 (A) The transcartilaginous incision and the nasal valve. (B-E) Examples of terribly scarred intranasal valves. (F) The 3 commonly used vestibular incisions (from cephalad to caudal) are depicted: (1) intercartilaginous incision, (2) intracartilaginous incision, (3) infracartilaginous (rimming) incision.

Intranasal vestibular incisions
See the list below:
-
Three vestibular incisions (from cephalad to caudal) are commonly used.
Intercartilaginous incision
Intracartilaginous incision
Infracartilaginous (rimming) incision
-
The intercartilaginous incision (see section F of the image below, incision 1) is positioned at the red-white line where the vestibular skin meets the mucosal lining at the intranasal side of the upper lateral cartilage. It opens the nasal valve area, leading to postoperative scarring and symptoms of obstructive bleeding. This author rarely trims the caudal ends of the upper lateral cartilages; thus, this incision, exposing the cartilage, is unnecessary.
(A) The transcartilaginous incision and the nasal valve. (B-E) Examples of terribly scarred intranasal valves. (F) The 3 commonly used vestibular incisions (from cephalad to caudal) are depicted: (1) intercartilaginous incision, (2) intracartilaginous incision, (3) infracartilaginous (rimming) incision.
-
The intracartilaginous incision (see section F of the image above, incision 2) preserves the integrity of the nasal valve while allowing excellent exposure. In the Joseph technique, this incision was made following the intercartilaginous incision and resulted in a bipedicle vestibular skin flap that could easily be torn or destroyed, causing additional scarring in the valve area. The author thoroughly believes that everything that was done in the past through the 2 incisions (intercartilaginous and transcartilaginous) can be effectively done through an intracartilaginous incision. This involves less surgery and better preserves the normal anatomy of the area.
-
The third incision is the infracartilaginous, or rimming, incision (see section F of the image below, incision 3). This incision must hug the caudal edge of the lower lateral cartilage. If the incision is made below the caudal edge of the cartilage, it may violate the alar rim. The author uses this incision to deliver the lower lateral cartilages. The delivery technique is very useful in a patient with a broad nasal tip.
(A) The transcartilaginous incision and the nasal valve. (B-E) Examples of terribly scarred intranasal valves. (F) The 3 commonly used vestibular incisions (from cephalad to caudal) are depicted: (1) intercartilaginous incision, (2) intracartilaginous incision, (3) infracartilaginous (rimming) incision.
-
The infracartilaginous incision, usually in conjunction with the intercartilaginous incision, is used by some surgeons to approach the lower lateral cartilage and to produce adequate exposure. However, this technique produces a bilateral pedicle flap and exposes all of the lower lateral cartilage, which means more scarring and a greater possibility of postoperative healing complications. The delineation and removal of the supratip fibroadipose tissue also becomes more difficult. Problems also can arise when an augmentation of the nasal tip projection is attempted in a patient with a short tip. Once an infracartilaginous incision has been made, placing an onlay graft over the dome becomes more difficult.
Elevation of the columella and/or nasal tip
See the list below:
-
The surgical plan for the columella and nasal tip is formulated upon examination of the patient's profile. If the nose is too long with a hanging columella, the columella is shortened by removing the caudal septum from the nasal spine to the septal angle. If the nasal length is acceptable but the tip droops, only the outer third of the columella should be elevated.
-
If the nasal spine is too prominent, it can be reduced by infracturing the nasal spine with an osteotome. However, overcorrection and removal of too much nasal spine produces a recessed nasolabial angle and a poor aesthetic result. The nasolabial angle should always be approximately 90° or slightly greater; for this reason, the author always trims the caudal end of the septum first. After looking at the new profile line, the author decides whether any nasal spine surgery is necessary.
-
Always look at the upper lip length before shortening the columella. An unfavorable postoperative result is a long upper lip as a consequence of overshortening the columellar septum. If a patient has a long upper lip and a long nose, a pleasing result can be achieved by elevating the nasal tip alone. This is accomplished by trimming and shortening the anterior 1/3 of the caudal septum.
-
In elevating the nasal tip, one does not want to create a straight line from the nasal spine to the newly created septal angle, as illustrated by the dotted line in section A of the image below). In too many patients, this straight-line technique produces a snub-nose look, with the columella sometimes hidden. Moreover, on the profile view the columella appears flat and straight.
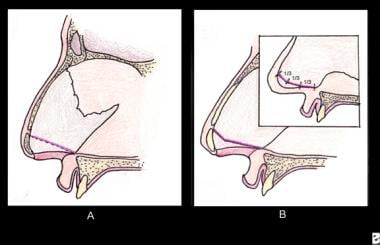 Nasal tip elevation. (A) Undesirable straight line from the nasal spine to the newly created septal angle is illustrated by the dotted line. (B) The surgeon should imagine the straight line that is desired in elevation and then create a line that lays caudal to the straight line. This second line forms an obtuse angle, producing an aesthetic contour in the columella that is both attractive and surgically safe. (Inset) If this obtuse angle is arbitrarily divided into thirds, the outer third produces the tip elevation.
-
The surgeon should imagine the straight line that is desired in elevation and then create a line that lies caudal to the straight line. This second line forms an obtuse angle (see section B of the image above), producing an aesthetic contour in the columella that is both attractive and surgically safe. If this obtuse angle is arbitrarily divided into thirds, it is the outer third that produces the tip elevation (see section B of the image above, inset).
-
This planning ensures that the posterior two thirds are lower and the nostril openings are kept more toward the horizontal plane. The nostrils are prevented from looking like gun barrels from the frontal view while the nasal tip is still adequately elevated.
-
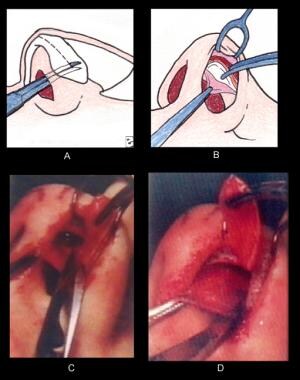
As the transfixion incision is made, it should hug the caudal end of the cartilaginous septum, and rarely should any of the membranous columella be excised (see section A of the image below).
 Nasal tip elevation. (A) The transfixion excision is made. It should hug the caudal end of the cartilaginous septum, and rarely should any of the membranous columella be excised. (B) The transfixion incision is made. This incision separates the membranous columella from the caudal end of the septum. (C-D) If it is necessary to trim the cartilage from the nasal spine to the septal angle, the incision is carried down to the nasal spine.
-
As a rule, the transcartilaginous incision should not be connected to the transfixion incision. By not joining these lines, one can prevent the formation of a scar in which the circular incision of the combined transcartilaginous incision and transfixion contracts to produce a straight line. (All curved incisions tend to contract into straight lines.) The author has seen many contracture scars in the area of the septal angle in postoperative patients with combined transcartilaginous and transfixion incision. Therefore, the author believes that keeping the incisions separate with intact vestibular skin (at least 3-4 mm) between the two is important.
-
One can visualize the result of a contracting circular scar as a lowering of nasal tip height. Remember, as the circular scar contracts, it exerts a posterior force on the soft tissue of the nasal tip. (This force is even more damaging in the old Joseph techniques, in which the domes were transected.)
-
The transfixion incision is made (see section B of the image below). This incision separates the membranous columella from the caudal end of the septum. If it is necessary to trim the cartilage from the nasal spine to the septal angle, the incision is carried down to the nasal spine (see sections C and D of the image below).
Nasal tip elevation. (A) The transfixion excision is made. It should hug the caudal end of the cartilaginous septum, and rarely should any of the membranous columella be excised. (B) The transfixion incision is made. This incision separates the membranous columella from the caudal end of the septum. (C-D) If it is necessary to trim the cartilage from the nasal spine to the septal angle, the incision is carried down to the nasal spine.
-
The elevation of the nasal tip begins by shaving the cartilage, starting at the nasal spine and extending the incision upward to the septal angle.
-
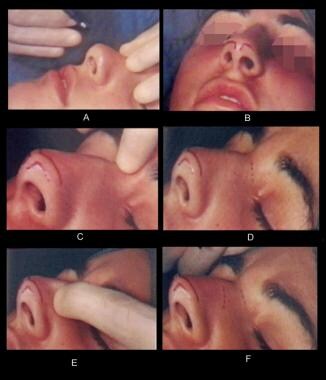
In this patient, the nasal spine was not producing a deformity; thus, the nasal spine was left intact. However, in many severely crowded lips, the caudal end of the septal cartilage needs to be trimmed to the desired line and angle. In this patient, the entire caudal end of the septum had to be trimmed. The cartilage is cut at the spine with a No. 15 blade (see section A of the image below), and the transection proceeds toward the septal angle (see section B of the image below). The hemostat in section C of the image below holds the segment of septal cartilage that is being excised. Although the segment of cartilage that has been removed appears to be straight (see section D of the image below), it is not. The incision is always curved superiorly (see section B of the image below), producing the obtuse angle.
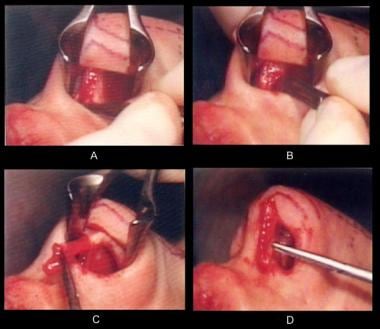 Nasal tip elevation. In this patient, the nasal spine was not producing the "crowded lip" deformity; thus, the nasal spine was left intact; a V-Y procedure of the frenulum had adequately treated the problem. However, in many severely crowded lips, the caudal end of the septal cartilage needs to be trimmed to the desired line and angle. In this patient, the entire caudal end of the septum had to be trimmed. (A) The cartilage is cut at the spine with a No. 15 blade scalpel. (B) The transection proceeds toward the septal angle. (C) The hemostat holds the segment of septal cartilage that is being excised. (D) Although the segment of cartilage that has been removed appears to be straight, it is not.
-
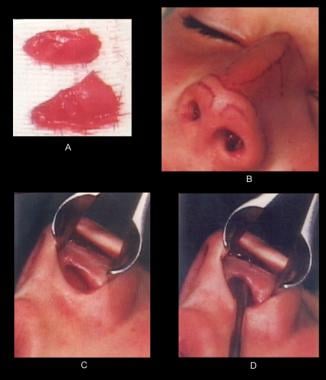
Section C of the image below shows the 3 segments of cartilage that have been removed: the lower lateral cartilages together with contiguous fat and the caudal end of the septal cartilage. By comparing the profile in section A of the image below with the one in section B, one can observe some decrease in the nasal tip height and that the dorsal hump appears to be larger. (The hump is only relatively larger; this apparent enlargement reflects the lowering of the nasal tip height.)
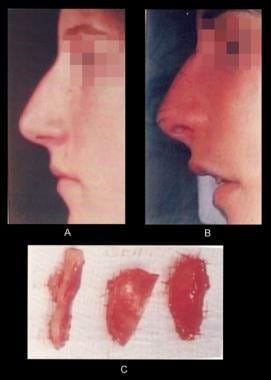 Nasal tip elevation. (A) Preoperative profile. (B) Intraoperative profile. (C) The 3 segments of cartilage that have been removed: the lower lateral cartilages together with contiguous fat and the caudal end of the septal cartilage.


-
Anesthesia for tip surgery is a regional block that circumferentially interrupts all the normal pathways to the nasal tip and bridge. (A) The highlighted area represents the area of the nasal bridge and nasal tip into which lidocaine is not injected. (B) For administration of the anesthetic, a 25-gauge needle and 5-mL syringe is inserted until bone is felt and directed cephalad. The injection is given as the needle is withdrawn. (C) The needle is then directed caudally and again the injection is given upon withdrawal, with the needle always positioned over the periosteum. (D) Next, the area of the infraorbital foramen is injected.
-
Anesthesia for tip surgery. (A) The area of the base of the alar rim is injected. (B) The intranasal block begins with an injection in the area of the piriform fossa. (C) The intercartilaginous line is injected intranasally.
-
Preparation and marking for tip surgery. The caudal borders of the lower lateral cartilage are palpated, and, using a skin marking pencil, those borders are outlined on the external skin. The intercartilaginous incision, which resembles a gull's wing, is next outlined on the external skin.
-
Preparation and marking for tip surgery.
-
(A-B) The suction tip is placed intranasally in the dome area beneath the sculpturing line that has been drawn on the external skin. (C) An imprint is created by applying pressure with the middle finger of the opposite hand against the tip of the suction. This imprint, which is merely a guide, marks the intracartilaginous (sculpturing) line that initially had been drawn on the external skin. (D) Using a No. 15 blade, the incision is begun at the imprint.
-
Nasal tip technique. (A) Using a No. 15 blade, the incision, begun at the imprint, is extended laterally, always parallel to the alar rim margin. (B) The incision is carried medially and laterally, always staying parallel to the alar rim. (C) The extent of the sculpturing incision depicted diagrammatically. (D) A mosquito hemostat is used to grasp the vestibular skin. By pulling downward, it is possible to expose the cephalad portion of lower lateral cartilage and the contiguous fibroadipose tissue between the skin and the cartilage. (E) This exposed area represents the cartilage and fat that will be removed.
-
Nasal tip technique. (A) After the incision has been made, the skin is undermined from the fibroadipose tissue and cartilage, especially in the central supratip area. (B) A histologic specimen taken through the cartilage and other tissue of the dome area. The fibrous fatty nature of this tissue is evident. (C-F) While the vestibular skin is held with a hemostat, the vestibular skin is separated from the intranasal side of the lower intranasal cartilage with sharp dissecting scissors. In (C), the hemostat grasping the vestibular skin is hidden by the sharp pointed scissors. The point of the hemostat is visible through the opened tip of the scissors in (F).
-
Nasal tip technique. (A) The dome of the lower lateral cartilage and a pocket that is being developed between the vestibular skin and the cartilage are shown. (B) A hemostat (instrument at right in the photograph) grasps the dome of the lower lateral cartilage, while another hemostat (at left) holds the vestibular skin. The sharp pointed scissors (in the center) are used to dissect the medial portion of the lower lateral cartilage to free it of any attachments. (C) Using the tips of the sharp pointed scissors, the vestibular skin is peeled from the lateral intranasal side of the lower lateral cartilage. (D) The scissors are inserted to transect the lateral portion of the lower lateral cartilage.
-
Nasal tip technique. (A) A simplified form of the scissors inserted to transect the lateral portion of the lower lateral cartilage. (B-D) The lower lateral cartilage is then transected and removed.
-
Nasal tip technique. (A) The specimens of cartilage that have been removed are shown. The attached fibroadipose tissue can be seen at the lower edge of the lower segment of cartilage and the upper edge of the other specimen. (B) The external nasal tip has developed highlighting at the transcartilaginous line. (C) After surgery of the lower lateral cartilages has been completed, an intranasal examination reveals an intact, preserved nasal valve. (D) In another view of the intranasal valve, a suction tip has been placed under the valve tenting it, and preservation of nasal anatomy is evident.
-
(A) The transcartilaginous incision and the nasal valve. (B-E) Examples of terribly scarred intranasal valves. (F) The 3 commonly used vestibular incisions (from cephalad to caudal) are depicted: (1) intercartilaginous incision, (2) intracartilaginous incision, (3) infracartilaginous (rimming) incision.
-
Nasal tip elevation. (A) Undesirable straight line from the nasal spine to the newly created septal angle is illustrated by the dotted line. (B) The surgeon should imagine the straight line that is desired in elevation and then create a line that lays caudal to the straight line. This second line forms an obtuse angle, producing an aesthetic contour in the columella that is both attractive and surgically safe. (Inset) If this obtuse angle is arbitrarily divided into thirds, the outer third produces the tip elevation.
-
Nasal tip elevation. (A) The transfixion excision is made. It should hug the caudal end of the cartilaginous septum, and rarely should any of the membranous columella be excised. (B) The transfixion incision is made. This incision separates the membranous columella from the caudal end of the septum. (C-D) If it is necessary to trim the cartilage from the nasal spine to the septal angle, the incision is carried down to the nasal spine.
-
Nasal tip elevation. In this patient, the nasal spine was not producing the "crowded lip" deformity; thus, the nasal spine was left intact; a V-Y procedure of the frenulum had adequately treated the problem. However, in many severely crowded lips, the caudal end of the septal cartilage needs to be trimmed to the desired line and angle. In this patient, the entire caudal end of the septum had to be trimmed. (A) The cartilage is cut at the spine with a No. 15 blade scalpel. (B) The transection proceeds toward the septal angle. (C) The hemostat holds the segment of septal cartilage that is being excised. (D) Although the segment of cartilage that has been removed appears to be straight, it is not.
-
Nasal tip elevation. (A) Preoperative profile. (B) Intraoperative profile. (C) The 3 segments of cartilage that have been removed: the lower lateral cartilages together with contiguous fat and the caudal end of the septal cartilage.