Overview
A dominant trend seen in all branches of surgery is the idea of minimal incisional access to achieve the desired surgical outcome while limiting surgical consequences and facilitating faster patient recoveries. Plastic surgeons have concerned themselves with this issue over a longer time period than have other surgical disciplines. The intent has been to maximize cosmetic benefits for patients through limiting and camouflaging scars.
In breast augmentation, one method of achieving this goal is through the remote placement of access incisions, as exemplified by the transaxillary endoscopic augmentation mammaplasty and transumbilical endoscopic augmentation (TUBA) mammaplasty procedures. With these procedures, the incisions are hidden in the first axillary crease and the navel, respectively, making the resulting scars very difficult to see. For this reason, these approaches are favored by many patients and surgeons alike.
Instruments using fiberoptics and endoscopic remote manipulation, combined with advances in technique, have resulted in consistently good results in the hands of appropriately trained surgeons. Reticulating endoscopes and high-definition cameras offer new visualization capabilities. These advances continue to bolster enthusiasm for these endoscopic approaches.
Transaxillary endoscopic augmentation mammaplasty
The transaxillary approach to breast augmentation was described by Troques in 1972 and Hoehler in 1973. [1, 2] Besides the obvious advantage of the hidden incision, this approach facilitated direct access to the subpectoral plane. With this technique, the inframammary crease was altered and the origin of the pectoralis muscle was dissected blindly, accounting for a significantly higher incidence of implant malposition. The limited exposure of the blind technique did not allow complete division of the prepectoral fascia, resulting in the tendency of high-riding implants or the double-bubble appearance of the inframammary crease.
The advent of endoscopic plastic surgery in the 1990s allowed the application of the endoscope to breast surgery. [3, 4] The Emory group reported their experience with endoscopic breast augmentation through an axillary incision in 1993 using a specialized retractor and an air-filled optical cavity. [5] Ho reported a technique that used glycine irrigation to create a liquid-filled optical cavity, although he now also uses a specialized retractor and an air-filled optical cavity. [6] The increased control resulting from direct visualization of the dissection obviated many of the previous downfalls of the blind axillary approach. Howard demonstrated the benefits of the endoscope with the axillary approach by decreasing the incidence of implant malposition from 8.6% to 2% when the endoscope was used. [7]
Endoscopic transaxillary augmentation mammaplasty is now a widely used technique and has withstood the test of time. However, the learning curve is significant, and more straightforward cases should be considered during the initial experience. [8, 9, 10, 11] The axillary approach has limited application in secondary cases. [12]
The images below depict a patient before and after transaxillary endoscopic augmentation mammaplasty.
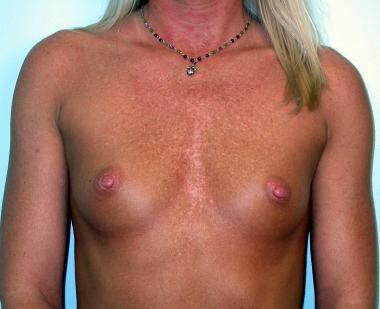 Preoperative photograph of patient before undergoing transaxillary endoscopic-assisted breast augmentation.
 Postoperative photograph of patient after undergoing transaxillary endoscopic-assisted breast augmentation.
Transumbilical endoscopic augmentation mammaplasty (TUBA)
The transumbilical approach was first implemented in 1991 by Johnson and Christ and described in detail in 1993. [13] The technique is unique as it does not employ a local or regional incision but rather uses a remote incision in the umbilicus. The TUBA endured significant early criticism but has gained popularity as it has been shown to be safe and reliable. Though TUBA is technically more challenging, a growing number of plastic surgeons are gaining expertise with this procedure. A primary criticism has been a lack of control of the operative site, especially with regard to bleeding and plane of dissection. With improved instrumentation and a general improvement in endoscopic skills, these criticisms have been proven invalid. The original study by Johnson reported a lower complication rate with less bleeding than other methods. [13]
Relevant Anatomy
Breast shape varies among patients, but knowing and understanding the anatomy of the breast (see the image below) ensures safe surgical planning. When the breasts are carefully examined, significant asymmetries are revealed in most patients. Any preexisting asymmetries, spinal curvature, or chest wall deformities must be recognized and demonstrated to the patient, as these may be difficult to correct and can become noticeable in the postoperative period. Preoperative photographs with multiple views are obtained on all patients and maintained as part of the office record.
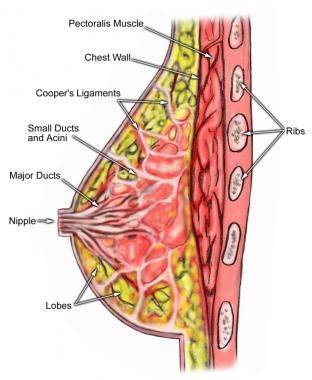
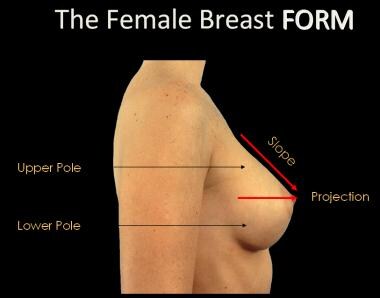
The base of the breast overlies the pectoralis major muscle between the second and sixth ribs in the nonptotic state. The gland is anchored to the pectoralis major fascia by the suspensory ligaments first described by Astley Cooper in 1840. These ligaments run throughout the breast tissue parenchyma from the deep fascia beneath the breast and attach to the dermis of the skin. Since they are not taut, they allow for the natural motion of the breast. These ligaments relax with age and time, eventually resulting in breast ptosis. The lower pole of the breast is fuller than the upper pole (see the image below).
For more information about the relevant anatomy, see Breast Anatomy.
Indications
Indications for endoscopic breast augmentation include the patient's desire for a remote incision and the absence of a well-developed inframammary crease to hide a crease incision below the horizontal visual axis.
Contraindications
Constricted lower pole
A constricted lower pole with a short distance from the inframammary crease to the areola is significantly more difficult and can require radial scoring of the breast parenchyma. The potential exists for inferior implant displacement from overdissection (lowering) of the inframammary crease and superior implant displacement from underdissection of the inframammary crease. In experienced hands, the transaxillary and umbilical approaches can be used for this type of anatomy.
Tubular breast
The need for correction of the herniated areola and the scoring of the constricted lower-pole parenchyma makes the periareolar access incision ideal for tubular breast deformity.
Ptosis
Endoscopic breast augmentation is possible to perform in pseudoptosis and grade 1 ptosis, but this anatomy requires the lowering of the inframammary crease to the base of the vertical descent of the breast. Ptosis is not considered ideal for the inexperienced surgeon and is subject to concerns of overdissection and underdissection of the inframammary crease.
Positioning
Transaxillary positioning
In the operating room, place the patient in the supine position with the arms on arm boards at approximately 80 degrees. Adherent drapes are useful at the lateral most aspect of the sterile field, since manipulation of the scope intraprocedurally can cause stapled drapes to be pushed below the line of sterility. Adherent drapes offset this problem.
Transumbilical positioning
Position the patient supine with arms extended to 90 degrees. Prepare and drape the patient in the standard fashion, leaving the chest and anterior abdominal surface exposed.
Technique
Preoperative consultation and physical examination
The importance of the initial consultation cannot be overemphasized. Discuss the four possible access incisions with the patient. Present the periareolar, inframammary crease, axillary, and umbilical incisions in a nonbiased manner, and assess the patient's enthusiasm for the axillary or umbilical incision. Discuss the potential complications of breast augmentation, emphasizing those complications unique to the endoscopic approaches. Discuss implant malposition, axillary hematoma, and lymphadenopathy. Finally, discuss the possible need for an additional inframammary crease incision to treat some complications with both approaches. All of the potential complications of breast augmentation must be discussed, including loss of nipple sensation, bleeding, infection, capsular contracture, asymmetry, unsatisfactory result, need for revisionary surgery, and so on.
Perform a physical examination. Describe the location of the proposed incision, and draw the position and size of the incision with a surgical marker. Pay particular attention to the distance from the areola to the inframammary crease and the transverse diameter of the breast. Assess the transverse diameter of the breast, and select implant size and direct fold adjustment. The need to lower the inframammary fold 1-2 cm is common; however, more than 3 cm should alert the physician to the presence of a constricted lower pole and the need for parenchyma alteration, which can be more straightforward with another approach. The ideal patient has a distance of 5-6 cm from the areola to the inframammary crease and, therefore, requires less inferior dissection.
Transaxillary procedure
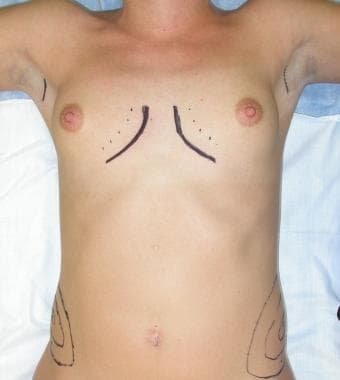
Preoperative considerations include accurate marking of the native and proposed placement of the inframammary crease. Mark the first axillary crease with a 2.5-cm incision well behind the anterior axillary line. Mark the midline, proposed cleavage, and position of the partial myotomy. The myotomy should be approximately 2 cm lateral to the origins of the pectoralis muscle to avoid overdissection medially and the potential for symmastia. An example of preoperative markings is shown below.
Position the patient as described above in Positioning.
Use a 1:10,000 epinephrine solution in the incision and at the position of partial myotomy. Take care when injecting the solution at the area of partial myotomy to prevent penetration of the chest wall.
Perform the incision through the axillary position with a No. 15 blade. Place 2 skin hooks and perform vertical spreading through the subcutaneous tissues until the pectoral fascia is reached. Follow the undersurface of the upper skin flap to the fascia to avoid injury to the intercostal brachial nerve. Insert the index finger, identify the underside of the pectoralis, and perforate the fascia to allow access to the submuscular plane.
Insert the endoscopic retractor, followed by the scope. The author uses the Emory-type retractor. Insert a 10-mm Hopkins rod endoscope within a sleeve in the retractor. After establishing the optical cavity, insert the endoscopic Bovie. Place low-wall suction on the endoscopic Bovie unit. Perform superior retraction with gradual enlargement of the pocket.
Commonly, an assistant holds the retractor during dissection; however, the need for this assistance is diminished with experience. Constantly assess the internal position of the retractor with relation to the breast external anatomy by looking at the scope's transillumination through the skin and by watching the tissues move through the scope during manipulation of the external breast tissues. If necessary, several angiocaths can be placed through the skin after superior retraction is performed to guide the myotomy during early experiences.
The myotomy of the pectoralis muscle origin is usually performed from the 3- to 6-o'clock position approximately 2 cm off the chest wall. The dissection proceeds superomedially to inferomedially. Perform the inferior dissection with care to avoid overdissection. Also, avoid overdissection or underdissection medially. A complete myotomy and incision of the pectoral fascia is necessary to achieve marked improvement in cleavage; however, in thin patients with minimal breast coverage, this can lead to rippling medially. Underdissection medially can result in a lack of a defined cleavage and superolateral implant malposition.
Thoughtfully determine the amount of inferior dissection needed to accommodate the dimensions of the implant chosen, based on the ideal transverse base diameter. In thin patients in whom a significant fold alteration is performed, the result can be a markedly palpable implant inferiorly. A bottom-heavy breast and possible inferior implant displacement can result from overdissection of the inframammary crease. Tapping of the inferior crease is a useful postoperative adjunct to set the crease during the postoperative period. Underdissection inferiorly can lead to superior implant displacement. An upper-pole strap can be useful postoperatively, especially in a breast with a tight lower pole, to set the implants in the lower part of the pocket.
Remove the endoscope and Bovie, and insert a deflated saline implant. A smooth implant surface is chosen almost universally. Roll the edges toward the center, and insert the compact implant with the help of Army-Navy retractors. Take care to avoid dissection or implant placement below the pectoralis minor. The implant is then inflated. Carefully dissect the lateral pocket with the index finger to avoid overdissection or injury to the sensory nerves. Refinement of the inferior and medial pocket can be achieved further with a large urethral dilator or a Dingman dissector. Place the patient in the sitting position to verify implant position and volume requirements.
Remove the fill tubes, and place the check caps. Close the axillary incisions with a layer closure followed by benzoin and a Steri-strip. No drains are used.
Transumbilical procedure
The midline from the sternal notch to the umbilicus should first be marked in patients undergoing the transumbilical approach. A line from the umbilicus tangent to the medial border of the areola is drawn bilaterally. The markings will be used to guide passage of the mammascope.
Position the patient as described above in Positioning.
An umbilical ring is elevated by the assistant using skin hooks at the 12-o'clock and 6-o'clock positions. The procedure necessitates an incision large enough to allow passage of the index finger without resistance. Scissors are used to then dissect superiorly onto the abdominal fascia.
Insert the mammascope through the umbilical incision. Pass the mammascope through the subcutaneous tissue while tenting the skin and subcutaneous tissue with the opposite hand. Follow the muscular surface and cross the costal margin. Then enter the fascial plane beneath the breast as the breast is tented away from the chest. The sudden decrease in resistance and advancement of the endoscope signal insertion into the fascial plane beneath the breast. Advance the endoscope superior to the nipple. Then, remove the internal obturator.
Determine correct placement of the endoscope by visualization of the tissue planes. The undersurface of the breast is light yellow in color, whereas the muscle appears reddish brown. Newer reticulating endoscopes allow greater adaptability with regard to visualization. With the ability to change view without moving the handpiece, less torque is generated at the incision, and the field of vision is greater in general. This also allows greater mobility of instrumentation, with a fixed handpiece positioned so as to prevent obstruction.
Evacuate the air from a posterior leaf valve implant and coil it in a cigar-like fashion. Connect the fill tube to an extension tube with a stopcock valve through the lumen of the mammascope. Insert the coiled implant into the open end of the mammascope and gently push it into the umbilical incision. Following insertion, push the implant with the fill tube insertion site facing the abdominal wall into the breast. Use the opposite hand to stabilize the implant as the mammascope is withdrawn, taking care not to dislodge the fill tube from the implant prematurely.
Inflate the implant to 150% of the desired volume. With excess saline in the implant, manipulate the implant externally in all directions. Clamp the fill tube and remove the extension tube. Approach the opposite breast in the same manner. After overfilling and further external manipulation, remove the excess volume and remove the fill tubes on both sides. Reinsert the mammascope on each side to visualize the implants. This confirms implant integrity and hemostasis. Finally, withdraw the mammascope and close the umbilical incision.
Postoperative details
Postoperative management is straightforward with both methods. Place dry gauze over the respective wounds for 24 hours. Steri-strips remain until the suture is removed at 10 days to 2 weeks. An upper-pole strap is worn for several days to several weeks, depending on the tightness of the inferior pocket. This forces the implant in an inferior direction. Massage of the implant pocket is begun at 2 weeks.
Complications
See the list below:
-
Complication rates for these procedures are comparable with other techniques for breast augmentation. [14]
-
Implant malposition: Most implant malpositions are related to superior displacement; however, inferior displacement with bottoming out is more difficult to treat. Inadvertent subpectoral implantation has been reported in the transumbilical approach. This occasionally cannot be corrected remotely and requires an inframammary incision.
-
Axillary banding: Fibrous banding across the axillary incision is believed to be either lymphatic channels or thrombophlebitis (Mondor disease).
-
Hematoma: Although meticulous hemostasis is one of the benefits of the endoscopic approach, axillary hematoma has been described, although rarely.
-
Deflation: Published reports suggest these complications to be similar to those of any other technique.
-
Capsular contracture
-
Preoperative markings.
-
Preoperative photograph of patient before undergoing transaxillary endoscopic-assisted breast augmentation.
-
Postoperative photograph of patient after undergoing transaxillary endoscopic-assisted breast augmentation.
-
Anatomy of the breast.
-
The female breast form.