Background
Intraosseous (IO) cannulation is a rapid and safe method to establish vascular access in a critically ill or injured patient when peripheral or central venous access is difficult or delayed. [1] [2, 3]
In addition to its use during pediatric cardiopulmonary resuscitation, IO cannulation should be considered in critically ill patients who require rapid access for stabilization. For example, in combat situations, IO placement has been used in critically wounded individuals (adults and children) receiving other life-saving interventions. [4, 5] Peripheral intravenous catheter insertion can be particularly challenging in infants and young children with hemodynamic instability and poor perfusion. [2, 6]
Establishing rapid vascular access can be a potentially life-saving procedure in patients with arrythmias, severe hemorrhage, septic shock, and respiratory failure. IO needle placement provides a route for administering fluids, blood products, and medications, [7, 8] as well as for the emergent administration of iodinated contrast material. [9] Additionally, IO access requires less skill and practice than central line and umbilical line placement. [10, 11] IO techniques have fewer serious complications than central lines, and they can be performed much faster than central or peripheral lines when vascular collapse is present. [11, 12, 13, 14]
IO insertion is recognized to be both safe and effective in all children and adults. [2, 15, 16] It has also been shown to be a reliable rescue technique in a helicopter emergency medical service. [17] Challenges with IO use in older patients arise from the increased difficulty of insertion through the thicker bone cortex and the smaller marrow cavity. Inability to enter the marrow may increase the likelihood of fracturing the bone. [13, 18, 19]
History of the procedure
In the early 1920s Cecil K. Drinker and colleagues at Harvard reported an animal model success in administering fluids into the bone marrow cavity which reached the intravascular circulation. [20] In the early 1930s, Tocantins and O’Neil established that the bone marrow cavity of long bones was a potential site of vascular access for infusions of fluid and blood. [21] Subsequently, in 1934, A. Josefson was the first to report on the therapeutic IO infusion in humans. [22] During World War II, IO infusions were used with the earliest published report of using an IO to resuscitate a wounded soldier in 1944 using a sternal needle. [23]
Despite early success with IO cannulation, its use as an alternative to traditional vascular access was limited until the 1980s. Several pediatric studies renewed interest in IO cannulation as a method to administer emergency medications during resuscitation. Encouraging results from these studies led to a greater appreciation of the utility of IO cannulation during pediatric resuscitation. In 1985, new pediatric resuscitation guidelines by the American Heart Association (AHA) recognized IO as a safe alternative to intravenous (IV) access. IO cannulation subsequently became part of the pediatric advanced life support (PALS) training (AHA, 1986). To reflect the growing acceptance of IO use to establish vascular access, the 2010 AHA PALS guidelines upgraded their IO access recommendation to "the initial vascular access in cases of cardiac arrest" (class 1, level of evidence C), thereby equating IV and IO access for resuscitative purposes. [24] Although IO use was initially recommended only in children younger than 6 years, the most current guidelines for adult and pediatric cardiopulmonary resuscitation support the use of IO techniques in patients of all ages. [2, 3, 15]
Anatomy and Pathophysiology
The red and yellow marrow of human long bones contains a rich network of vessels that drains into a central venous canal, emissary veins and, ultimately, the central circulation. Within the epiphysis (proximal and distal end) of the medullary space of long bones, is an extensive network of blood vessels which extend both vertically (Haversian canals) and horizontally (Volkmann canals). [14] This abundant venous network can function as a noncollapsible venous access route when peripheral or central venous access have failed. [25] This is particularly important in patients in shock or cardiac arrest, when peripheral veins can collapse and blood is shunted to the core due to compensatory peripheral vasoconstriction. [14] Intraosseous (IO) access via manual needles or battery powered IO drivers (see the following images) allows direct access to the medullary bone marrow and venous drainage of long bones. Establishing an IO route for vascular access allows medications and fluids to enter the central circulation within seconds.
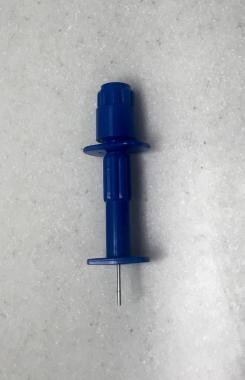 This image depicts an intact bone marrow aspiration/intraosseous infusion needle.
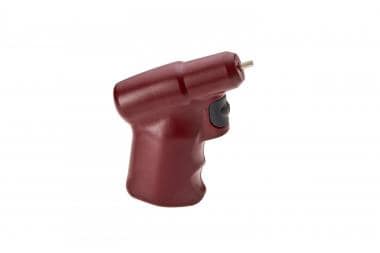 An EZ-IO driver is shown. Image courtesy of Teleflex Incorporated. © 2019 Teleflex Incorporated. All rights reserved.
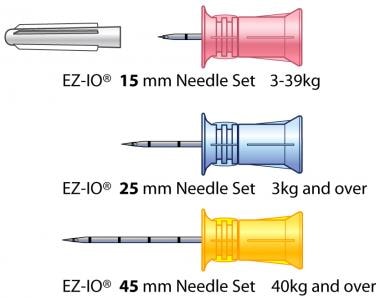 EZ-IO needle sets are depicted. Image courtesy of Teleflex Incorporated. © 2019 Teleflex Incorporated. All rights reserved.
IO and associated vascular access sites include the distal femur (branches of femoral vein), proximal tibia (popliteal vein), distal tibial/medial malleolus (great saphenous vein), proximal humerus (axillary vein), manubrium/upper sternum (internal mammary and azygous veins), anterior inferior iliac spine, clavicle (subclavian vein), and distal radius or ulna (brachiocephalic veins). (See the image below for pediatric IO access sites.)
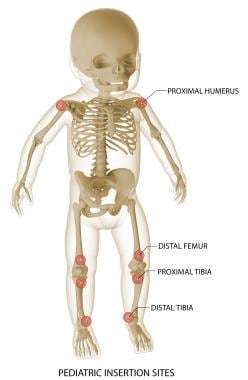 EZ-IO pediatric insertion sites are shown. Image courtesy of Teleflex Incorporated. © 2019 Teleflex Incorporated. All rights reserved.
Any intravenous (IV) medications and fluids can be administered by an IO route in an emergent situation. Colloids, crystalloids, blood products, antibiotics, vasopressors, inotropes, contrast agents, steroids, sodium bicarbonate, dextrose, heparin, hyperosmolar fluids, sedatives, and analgesics can all be given via an IO route. [23, 26, 27]
The validity of certain laboratory values obtained via an IO route has been challenged. [28, 29] Direct venous sampling remains the primary reliable standard to obtain the majority of laboratory tests. [23] Studies have reported that bone marrow values for certain laboratory values may be inaccurate in comparison to direct venous samples. Thus, interpretation of the following laboratory values should be done with caution: blood oxygenation, potassium, glucose, partial pressure of carbon dioxide (PCO2), lactate dehydrogenase, white blood cell count, platelet count, as well as levels of aspartate aminotransferase (SGOT), alanine aminotransferase, alkaline phosphatase, and ionized calcium. [23, 26, 27]
Laboratory values obtained from bone marrow that are consistent with direct venous samples include hemoglobin, hematocrit, pH, base excess, serum bicarbonate, sodium, chloride, magnesium, phosphorus, total calcium, albumin, blood urea nitrogen, creatinine, bilirubin, total protein, uric acid, type and screen, serum drug levels, and blood cultures (eg, bacterial, viral, or fungal cultures). [23, 26, 27]
Risks and Complications
Risks and complications of intraosseous (IO) insertion are few. The benefits of obtaining rapid access in to facilitate the administration of medications, fluids or blood products far outweigh the risks in a patient with a life-threatening illness or injury. IO cannulation needles should be removed as soon as peripheral or central venous access is obtained to avoid complications. [14] Obtaining alternative intravenous (IV) access soon after the emergency and subsequent removal of the IO needle decreases the likelihood of complications. In most instances, the goal is to remove the IO needle within 24 hours of placement once alternative vascular access is secured.
Known rare complications of IO access include extravasation, soft-tissue necrosis, bone fractures or injury to growth plates, infiltration of medications, infection, subcutaneous abscess, osteomyelitis, and embolic complications (fat emboli). [1, 13, 18, 19, 23, 25, 30, 31, 32]
Extravasation of fluid is the most common complication. [13] It typically occurs when the needle tip is not appropriately placed within in the marrow cavity. Extravasation of caustic or hypertonic medications such as calcium chloride, sodium bicarbonate, or dopamine can result in necrosis of the surrounding muscle tissue. Although rare, even with a properly place needle, extravasations can occur if there is increased movement during or after IO insertion that causes the entry site to enlarge. With severe extravasations, compartment syndrome may occur. [13, 19] IO extravasation and compartment syndrome can be avoided by the limiting of one IO cannulation attempt per bone site. [13, 23] Serial assessments of the IO site for signs of malposition and fluid accumulation is essential to identify early signs of extravasation. [13, 23]
Infection and osteomyelitis are relatively rare complications but can occur if an aseptic technique is not followed or the patient has active bacteremia. Cellulitis at the insertion site has also been reported. [19, 31]
Fat or bone marrow embolisms have been demonstrated in the lungs but with few reports of an unfavorable clinical correlation or deterioration. [13, 23, 33] There are no reported significant findings of alterations to partial pressure of oxygen (PaO2) levels or significant intrapulmonary shunting. [13, 23]
With increased training, education, and awareness of the proper use and placement techniques of IO needles and devices, the complications and risks of these procedures can be minimized. [34]
Indications
When peripheral or central access is not readily available or unable to be obtained quickly, intraosseous (IO) cannulation is indicated for the following:
Several articles have described the use of IO access in nontraditional settings such as the military, rescue scenarios, and simulated chemical and biological disaster training where rapid access may be crucial, peripheral venous access may be hard to obtain, and first responders may have limited experience or technical capacity. [4, 5, 17, 26, 36, 37, 38, 39, 40]
Contraindications
The only absolute contraindication to intraosseous (IO) access is fracture of the tibia or long bones, which are potential sites for IO insertion.
Relative contraindications to IO insertion include the following [13, 14, 23] :
-
Cellulitis overlying the insertion site (Despite the risk of introducing bacteria into the bone or bloodstream, in the absence of other alternatives, cellulitis overlying the selected site does not preclude IO needle placement.)
-
Inferior vena cava injury (The fluid infused must be able to drain into the central circulation. If this injury is suspected, central venous access superior to the injury is preferred.)
-
Previous attempt on the same leg bone
-
Osteogenesis imperfecta (because of a higher likelihood of fractures occurring)
-
Known bone fragility such as osteopetrosis and osteopenia
-
Fractured bone
-
Crush injuries
-
Site trauma
-
Extremity with a vascular cutdown
-
Loss of skin integrity
-
Known osteomyelitis at the site
-
Known right-to-left intracardiac shunt–related congenital heart disease (eg, Tetralogy of Fallot, pulmonary atresia), or those who have an increased risk of cerebral fat and bone marrow emboli complications [35]
Intraosseous Devices
There are four main intraosseous (IO) devices, as discussed below.
Manual needles
There are several commercial manual IO needles available, and they have been shown to be easily used in pediatric patients and adults, such as the following [14, 41, 42] :
-
The Jamshidi/Illinois bone marrow aspiration/IO infusion needle, in 15 and 18 gauge (G) (CareFusion, Vernon Hills, IL) [43]
-
The threaded Sur-Fast IO infusion needle and the modified Dieckmann IO infusion needle (both from Cook Critical Care, Bloomington, IN) [44] : These needles can be used in the femur, proximal and distal tibia including the malleoli, sternum, humeral head, distal radius and ulna, and ilium.
See the images below.
This image depicts an intact bone marrow aspiration/intraosseous infusion needle.
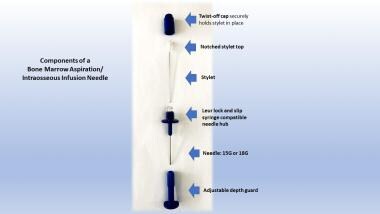 The components of a bone marrow aspiration/intraosseous infusion needle are shown.
The Arrow EZ-IO
The Arrow EZ-IO vascular access system (Teleflex, Morrisville, NC) is an easy to use and train, lithium battery-powered, reusable IO driver, [14, 41, 42, 45] which comes with a three-needle set for single patient use [46] :
-
15-G 15-mm long (pink) needles for 3-39 kg patients
-
15-G 25mm long (blue) needles for 3 kg and heavier patients
-
15-G 45mm (yellow) needles for 40kg and heaver patients with excess tissue/edema over the insertion site, which includes the proximal and distal tibia and humeral head (but not indicated for sternal use)
The EZ-IO device has been shown to be effective in achieving vascular access in the prehospital setting with a 90% success rate. [45]
An EZ-IO driver is shown. Image courtesy of Teleflex Incorporated. © 2019 Teleflex Incorporated. All rights reserved.
EZ-IO needle sets are depicted. Image courtesy of Teleflex Incorporated. © 2019 Teleflex Incorporated. All rights reserved.
EZ-IO pediatric insertion sites are shown. Image courtesy of Teleflex Incorporated. © 2019 Teleflex Incorporated. All rights reserved.
 EZ-IO needle size comparison at a tibial bone site. Always use clinical judgment to determine selection of the appropriate needle based on the patient's weight, the bone anatomy, and the tissue depth overlying the insertion site. Image courtesy of Teleflex Incorporated. © 2019 Teleflex Incorporated. All rights reserved.
The FAST1, FASTX, and FASTResponder
The FAST1, FASTX, and FASTResponder (Pyng Medical, a subsidiary of Teleflex, Morrisville, NC) are single-use IO devices that were designed for placement into the sternum/manubrium. [41, 42, 47, 48, 49] They contain a sterile disposable probe with multiple needles and are generally used exclusively in adults or children greater than 12 years of age. [47, 48]
The Bone Injection Gun (BIG)
The Bone Injection Gun (PerSys Medical) [50, 51] is available as adult and pediatric IO devices. These single-use, spring-loaded insertion devices have been approved by the US Food and Drug Administration (FDA) approved for use in the proximal tibia and humeral head in adults. [14, 41, 42] These devices have an automatic plastic disposable IO injector. The adult version has a 15G needle with a preset insertion depth of 2.5 cm or 1 inch; the pediatric version has an 18G needle with adjustable insertion depths of 0.5 cm and 1.5 cm. [50, 51]
Procedure and Technique
In nonemergent cases, it is important to discuss the risks and benefits of the intraosseous (IO) access procedure and obtain consent from the patient or guardian. During an emergency, refer to institutionalized hospital policies regarding informing the patient or guardian.
Equipment
The following equipment should be assembled prior to the procedure:
-
Antiseptic: Povidone iodine or chlorhexidine
-
Sterile latex-free gloves
-
Surgical mask and eye covering for the clinician performing the procedure
-
5-10 cc Syringe with normal saline flush
-
IO needle and/or device
-
Small-volume syringe with 1% lidocaine for infiltration via small-bore gauge needle (ie, 25G) prior to IO insertion
Tibial IO access has the highest first-attempt success rate and the quickest time for achieving vascular access during out-of-hospital cardiac arrest when compared with peripheral intravenous (IV) and humeral IO access. [52] Proximal tibial IO insertion is the most commonly recommended primary site because it provides a flat surface with a thin layer of overlying tissue, making landmarks easier to identify. Additionally, the site is far from the chest and airway so it does not interfere with or limit airway and chest compression efforts during an active cardiopulmonary resuscitation.
Procedure
Manual IO needle insertion in the proximal tibia is as follows:
Position the leg by keeping knee slightly bent and abducted with a towel roll under the calf.
Below the knee, locate the tibial landmarks and palpate the flat area of the bone medial to the tibial tuberosity.
Cleanse the insertion site with antiseptic solution.
While the antiseptic solution is drying, prepare the equipment and use sterile gloves and techniques.
Inject local anesthetic to the insertion site.
Select the appropriate length of IO needle.
Stabilize the extremity with the nondominant hand of the clinician performing the procedure.
Perpendicularly place the capped IO needle in the center palm of the clinician's dominant hand with the index finger on the piece of the needle's adjustable depth guard.
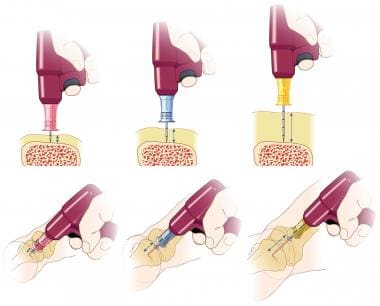
Insert the IO needle through the patient's skin and subcutaneous tissue at a 90º angle to the center of the bone (ie, directed away from the growth plate); adjust the depth guard to the appropriate length.
Using a twisting-type motion with constant pressure, advance the IO needle through the cortex of the bone. Usually, a popping sensation or lack of resistance is felt once the needle enters the marrow cavity.
The IO needle should feel firmly fixed to the bone and stand 90º upright without support.
Remove the inner stylet from the needle, attach a 5- to 10-cc syringe to the needle, and pull back on the syringe to aspirate bone marrow. Note that marrow may not always be aspirated.
Use a 5- to 10-cc syringe of isotonic normal saline fluid to easily flush the needle; observe for extravasation in the calf area.
Attach a T-connector with a three-way stopcock to the needle hub. Attach IV line tubing to the stopcock to prevent clotting.
Secure the IO needle in place with gauze pads and tape.
EZ-IO Placement: Infant/Child Proximal Tibia Procedure
Clinical education resources including detailed, downloadable printed and video instructions on the use of the Arrow EZ-IO intraosseous (IO) vascular access system for infants/children and adults are available at https://www.teleflex.com/usa/clinical-resources/ez-io/index?language_id=11. This section will discusss only the infant/child EZ-IO proximal tibia procedure.
EZ-IO proximal tibia infant/child needle set selection and insertion technique
A computer-generated animation of the steps to correctly select the appropriate-length needle set in infants and children is available at https://vimeopro.com/user8605084/ez-io/video/110932138. The video also demonstrates how to identify the proximal tibia insertion site, as well as the proper insertion and removal techniques. Printed instructions are outlined below and available at https://www.teleflex.com/global/clinical-resources/ez-io/EZ-IO_Proximal_Tibia_Infant-Child_Site_and_Insertion_T-536_RevB.docx.
The following instructions have been lightly edited for clarity.
EZ-IO proximal tibia insertion site identification (infant/child)
-
Extend the selected leg of the infant/child.
-
The insertion site is about 1 cm medial to the tibial tuberosity, or just below the patella (ie, about 1 cm or one finger width) and slightly medial (approximately 1 cm or one finger width), along the flat aspect of the tibia.
-
Pinch the tibia between your fingers to identify the center of the medial and lateral borders.
EZ-IO proximal tibia insertion technique (infant/child)
-
Prepare the site with the selected antiseptic (clinician's choice)
-
Use a clean, “no touch” technique.
-
Remove the needle set cap.
-
Stabilize the extremity.
-
Aim the needle set at a 90º angle to the center of the bone.
-
Push the needle set tip through the skin until the tip rests against the bone.
-
The 5-mm mark must be visible above the skin for confirmation of adequate needle set length.
-
Gently drill, immediately release the trigger when the “pop” or “give” is felt as the needle set enters the medullary space. Avoid recoil—do NOT pull back on the driver when releasing the trigger.
-
Hold the hub in place, and pull the driver straight off.
-
Continue to hold the hub while twisting the stylet off the hub with counterclockwise rotations. The catheter should feel firmly seated in the bone (first confirmation of placement).
-
Place the stylet in a sharps container.
-
Place the EZ-Stabilizer dressing over the hub.
-
Attach a primed EZ-Connect extension set to the hub; firmly secure it by twisting it clockwise.
-
Pull the tabs off the EZ-Stabilizer dressing to expose the adhesive; apply to the skin.
-
Aspirate for blood/bone marrow (second confirmation of placement).
Recommended anesthetic
Infant/child responsive to pain
-
Observe the recommended cautions/contraindications to using 2% preservative- and epinephrine-free lidocaine (intravenous [IV] lidocaine)
-
Confirm the appropriate lidocaine dose per institutional protocol. The usual initial dose is 0.5 mg/kg, not to exceed 40 mg.
-
Prime the EZ-Connect extension set with lidocaine. (Note that the priming volume of the EZ-Connect is approximately 1.0 mL.) For small lidocaine doses, consider administering by carefully attaching the syringe directly to the needle hub (prime the EZ-Connect with normal saline).
-
Slowly infuse the lidocaine over 120 seconds. Allow the lidocaine to dwell in the IO space for 60 seconds.
-
Flush with 2-5 mL of normal saline.
-
Slowly administer the subsequent lidocaine dose (half the initial dose) IO over 60 seconds. Repeat as needed (PRN).
-
Consider systemic pain control for patients not responding to IO lidocaine.
Infant/child unresponsive to pain
-
Prime the EZ-Connect extension set with normal saline.
-
Flush the IO catheter with 2-5 mL of normal saline.
-
Connect fluids if ordered; the infusion may need to be pressurized to achieve the desired rate.
-
Assess for any signs of extravasation/complications.
-
Should the patient develop signs that indicate responsiveness to pain, refer back to the section above for "Infant/child responsive to pain.”
EZ-IO removal technique
The process to remove the EZ-IO catheter is as follows:
-
Remove the EZ-Connect extension set and the EZ-Stabilizer dressing.
-
Stabilize the catheter hub, and attach a Luer lock syringe to the hub.
-
While maintaining axial alignment, twist the catheter clockwise and pull straight out. Do not rock the syringe.
-
Dispose of the catheter with the syringe attached into a sharps container.
Notes
The use of any medication, including lidocaine, given IV or IO is the responsibility of the treating physician, medical director or qualified prescriber and not an official recommendation of Teleflex. Teleflex is not the manufacturer of lidocaine, and the user should be familiar with the manufacturer’s instructions or directions for use for all indications, side-effects, contraindications, precautions and warnings of lidocaine. Teleflex disclaims all liability for the use, application or interpretation of the use of this information in the medical treatment of any patient. Lidocaine dosing recommendations were developed based on research; for additional information, please visit www.eziocomfort.com
This material is not intended to replace standard clinical education and training by Vidacare LLC, a subsidiary of Teleflex, Inc., and should be utilized as an adjunct to more detailed information which is available about the proper use of the product. View educational resources at www.teleflex.com/ezioeducation or contact a Teleflex clinical professional for any detailed questions related to product insertion, maintenance, removal and other clinical education information.
Teleflex and EZ-IO are registered trademarks of Teleflex Incorporated or its affiliates.
© 2014 Teleflex Incorporated. All rights reserved. MC-000235 Rev 1
Courtesy of Teleflex Incorporated. © 2019
Alternative Insertion Sites: Distal Femur
Alternative sites for intraosseous (IO) placement include the distal femur, distal tibia, sternum, and humerus. This section discusses only the infant/child EZ-IO distal femur procedure.
Clinical education resources including detailed, downloadable printed and video instructions on the use of the Arrow EZ-IO intraosseous (IO) vascular access system for infants/children and adults are available at https://www.teleflex.com/usa/clinical-resources/ez-io/index?language_id=11.
EZ-IO infant/child distal femur site identification and insertion technique
A computer-generated animation of the steps to correctly select the appropriate-length needle set in infants and children is available at https://vimeopro.com/user8605084/ez-io/video/173518899. The video also demonstrates how to identify the distal tibia insertion site, as well as the proper insertion and removal techniques. Printed instructions are outlined below and available at https://www.teleflex.com/global/clinical-resources/ez-io/VC_IO_Distal-Femur-ID-Insert-Infant-Child_AI_MC-000235_Rev01.docx.
The following instructions have been lightly edited for clarity.
EZ-IO distal femur insertion site identification (infant/child)
-
Secure the selected leg in the outstretched position to ensure the knee does not bend.
-
Identify the patella by palpation.
-
The insertion site is just proximal to the patella (maximum 1 cm) and approximately 1-2 cm medial to the midline.
EZ-IO distal femur insertion technique (infant/child)
-
Prepare the site with the selected antiseptic (clinician's choice)
-
Use a clean, “no touch” technique.
-
Remove the EZ-IO needle set cap.
-
(Stabilize the extremity.) Aim the needle set toward the center of the bone at a 90º angle.
-
Push the needle set tip through the skin until the tip rests against the bone.
-
The 5-mm mark must be visible above the skin for confirmation of adequate needle set length.
-
Gently drill, immediately release the trigger when the “pop” or “give” is felt as the needle set enters the medullary space. Avoid recoil—do NOT pull back on the driver when releasing the trigger.
-
Hold the hub in place, and pull the driver straight off.
-
Continue to hold the hub while twisting the stylet off the hub with counterclockwise rotations. The catheter should feel firmly seated in the bone (first confirmation of placement).
-
Place the stylet in a sharps container. Always dispose of all sharps and biohazard materials from IO lines using standard biohazard practices and disposal containers. If using the NeedleVISE 1-port sharps block, place it on stable surface and use a one-handed technique to dispose of the sharps.
-
Place the EZ-Stabilizer dressing over the hub.
-
Attach a primed EZ-Connect extension set to the hub; firmly secure it by twisting it clockwise.
-
Pull the tabs off the EZ-Stabilizer dressing to expose the adhesive; apply to the skin.
-
Aspirate for blood/bone marrow (second confirmation of placement). Inability to withdraw/aspirate blood from the catheter hub does not mean the insertion was unsuccessful. Consider attempting to aspirate after the flush. Site placement can also be confirmed by the ability to administer pressurized fluids, and noting the pharmacologic effects of medication administration after flow is established.
-
Continue per the instructions below: patients responsive or unresponsive to pain.
NOTE: The leg should remain immobilized until the IO catheter is removed.
NOTE: In the unlikely event that the battery on the driver fails, clinicians may manually insert the needle set by penetrating the bone cortex with steady, firm pressure. Do NOT use excessive force, do NOT rock or bend the needle set during insertion.
Recommended anesthetic
Infant/child responsive to pain
-
Observe the recommended cautions/contraindications to using 2% preservative- and epinephrine-free lidocaine (intravenous [IV] lidocaine)
-
Confirm the appropriate lidocaine dose per institutional protocol. The usual initial dose is 0.5 mg/kg, not to exceed 40 mg.
-
Prime the EZ-Connect extension set with lidocaine. (Note that the priming volume of the EZ-Connect is approximately 1.0 mL.) For small lidocaine doses, consider administering by carefully attaching the syringe directly to the needle hub (prime the extension set with normal saline).
-
Slowly infuse the lidocaine over 120 seconds. Allow the lidocaine to dwell in the IO space for 60 seconds.
-
Flush with 2-5 mL of normal saline.
-
Slowly administer the subsequent lidocaine dose (half the initial dose) IO over 60 seconds. Repeat as needed (PRN).
-
Consider systemic pain control for patients not responding to IO lidocaine.
Infant/child un responsive to pain
-
Prime the EZ-Connect extension set with normal saline.
-
Flush the IO catheter with 2-5 mL of normal saline.
-
Connect fluids if ordered; the infusion may need to be pressurized to achieve the desired rate.
-
Assess for any signs of extravasation/complications.
-
If the patient develops signs that indicate responsiveness to pain, refer back to the section above for "Infant/child responsive to pain.”
EZ-IO catheter removal technique
The process to remove the EZ-IO catheter is as follows:
-
Remove the extension set and dressing.
-
Stabilize the catheter hub, and attach a Luer lock syringe to the hub.
-
While maintaining axial alignment, twist the catheter clockwise and pull straight out. Do not rock the syringe.
-
Dispose of the catheter with the syringe attached into a sharps container.
Other notes
The use of any medication, including lidocaine, given IV or IO is the responsibility of the treating physician, medical director or qualified prescriber and not an official recommendation of Teleflex. Teleflex is not the manufacturer of lidocaine, and the user should be familiar with the manufacturer’s instructions or directions for use for all indications, side-effects, contraindications, precautions and warnings of lidocaine. Teleflex disclaims all liability for the use, application or interpretation of the use of this information in the medical treatment of any patient. Lidocaine dosing recommendations were developed based on research; for additional information, please visit www.eziocomfort.com
This material is not intended to replace standard clinical education and training by Vidacare LLC, a subsidiary of Teleflex, Inc., and should be utilized as an adjunct to more detailed information which is available about the proper use of the product. View educational resources at www.teleflex.com/ezioeducation or contact a Teleflex clinical professional for any detailed questions related to product insertion, maintenance, removal and other clinical education information.
Teleflex and EZ-IO are registered trademarks of Teleflex Incorporated or its affiliates.
© 2014 Teleflex Incorporated. All rights reserved. MC-000235 Rev 1
Courtesy of Teleflex Incorporated. © 2019
-
This image depicts an intact bone marrow aspiration/intraosseous infusion needle.
-
The components of a bone marrow aspiration/intraosseous infusion needle are shown.
-
An EZ-IO driver is shown. Image courtesy of Teleflex Incorporated. © 2019 Teleflex Incorporated. All rights reserved.
-
EZ-IO needle sets are depicted. Image courtesy of Teleflex Incorporated. © 2019 Teleflex Incorporated. All rights reserved.
-
EZ-IO pediatric insertion sites are shown. Image courtesy of Teleflex Incorporated. © 2019 Teleflex Incorporated. All rights reserved.
-
EZ-IO needle size comparison at a tibial bone site. Always use clinical judgment to determine selection of the appropriate needle based on the patient's weight, the bone anatomy, and the tissue depth overlying the insertion site. Image courtesy of Teleflex Incorporated. © 2019 Teleflex Incorporated. All rights reserved.


