Overview
Pericardiocentesis is the aspiration of fluid from the pericardial space that surrounds the heart. This procedure can be life saving in patients with cardiac tamponade, even when it complicates acute type A aortic dissection and when cardiothoracic surgery is not available. [1]
Cardiac tamponade is a time sensitive, life-threatening condition that requires prompt diagnosis and management. Historically, the diagnosis of cardiac tamponade has been based on clinical findings. Claude Beck, a cardiovascular surgeon, described two triads of clinical findings that he found associated with acute and chronic cardiac tamponade. The first of these triads consisted of hypotension, an increased venous pressure, and a quiet heart. It has come to be recognized as Beck's triad, a collection of findings most commonly produced by acute intrapericardial hemorrhage. Subsequent studies have shown that these classic findings are observed in only a minority of patients with cardiac tamponade. [2]
The detection of pericardial fluid has been facilitated by the development and continued improvement of echocardiography. [3] Cardiac ultrasonography is now accepted as the criterion standard imaging modality for the assessment of pericardial effusions and the dynamic findings consistent with cardiac tamponade. With echocardiography, the location of the effusion can be identified, the size can be estimated (small, medium, or large), and the hemodynamic effects can be examined by assessing for abnormal septal motion, right atrial or right ventricular inversion, and decreased respiratory variation of the diameter of the inferior vena cava. [4]
Moreover, a 2017 retrospective study (2007-2012) of 18 nontrauma patients diagnosed with large pericardial effusions or tamponade in an emergency department suggests that point-of-care ultrasonography (POCUS) may be effective in identifying pericardial effusions and guiding appropriate treatment, with a resultant decreased time to pericardiocentesis and decreased length of hospital stay. [5]
Subxiphoid views of pericardial effusion are shown below.
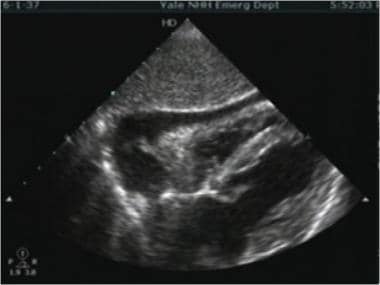 Pericardiocentesis. Subxiphoid view of the heart demonstrating a moderate sized pericardial effusion.
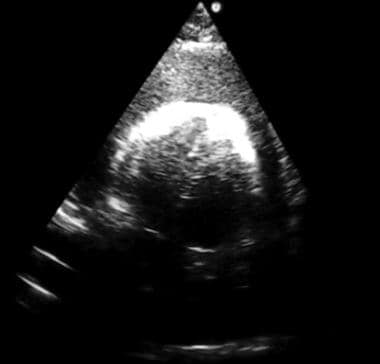 Pericardiocentesis. Subxiphoid view of the heart demonstrating a large pericardial effusion.
The video below depicts subxiphoid cardiac tamponade.
This article describes the landmark or “blind” syringe and needle technique used as a lifesaving measure for the prompt management of cardiac tamponade. Although a retrospective study has reported success and no complications with a novel pericardiocentesis technique that uses an in-plane parasternal medial-to-lateral approach with the use of a high-frequency probe in 11 patients with cardiac tamponade, larger studies and further investigation are needed. [6]
Historical background
Percutaneous pericardiocentesis was introduced during the 19th century. Frank Schuh first described this procedure in 1840. By the 20th century, percutaneous pericardiocentesis became a preferred technique for the treatment of patients with pericardial effusion or for diagnostic purposes.
Before the advent of 2-dimensional echocardiography, the procedure used a blind-subxiphoid approach. Serious complications were not uncommon (eg, injury to liver, myocardium, coronary arteries, lungs). Because 2-dimensional echocardiography permits direct visualization of cardiac structures and adjacent vital organs, the procedure now is performed with minimal risk. Since 1979, echo-guided pericardiocentesis has been the preferred initial procedure for the diagnosis and treatment of most pericardial effusions. The technique has been modified and refined in the past 22 years. Percutaneous pericardiocentesis now is the procedure of choice for the safe removal of pericardial fluid. Whenever possible, this procedure should be performed by a surgeon, an interventional cardiologist or a cardiologist trained in invasive techniques.
There is no significant difference in overall mortality between open surgical drainage and percutaneous pericardiocentesis for symptomatic pericardial effusions. There may be more procedural complications following surgical drainage of a pericardial effusion, and the need for repeat procedures may be greater if the effusion is drained using pericardiocentesis. [7]
Indications
Emergent pericardiocentesis
The indication for emergent pericardiocentesis is the presence of life-threatening hemodynamic changes in a patient with suspected cardiac tamponade. [8]
Nonemergent pericardiocentesis
The aspiration of pericardial fluid in hemodynamically stable patients for diagnostic, palliative, or prophylactic reasons, performed under ultrasonography, computerized tomography, or fluoroscopic visualization. [9, 10]
Contraindications
Absolute contraindications
In the hemodynamically unstable patient, no absolute contraindications exist to performing pericardiocentesis. The withdrawal of even a small amount of pericardial fluid may dramatically improve the patient’s hemodynamic status. [8]
Relative contraindications
Relative contraindications include uncorrected bleeding disorders [11, 12] and traumatic cardiac tamponade. Some authors argue that traumatic cardiac tamponade should be treated by emergent thoracotomy. [13]
Equipment
Essential equipment includes the following:
-
Antiseptic solution
-
Sterile drapes, gown, and mask
-
Local anesthetic (eg, lidocaine 1%)
-
Syringes, 10 mL and 60 mL
-
Scalpel, No. 11
-
Needles, 18 ga, 1.5 in; 25 ga, 5/8 in
-
Spinal needle, 18 ga, 7.5-12 cm
Recommended equipment includes the following:
-
Commercially produced pericardiocentesis kit
-
Nasogastric tube
-
Ultrasound machine
-
Sterile ultrasound probe cover
-
Alligator clip connector for connection to V1 lead of ECG machine
Technique
For additional information regarding anesthesia, see Local Anesthetic Agents, Infiltrative Administration.
Patient positioning
Position the patient in a semirecumbent position at a 30- to 45-degree angle. This position brings the heart closer to the anterior chest wall.
The supine position is an acceptable alternative.
Emergent needle pericardiocentesis
For patients too sick to be transferred to the catheterization laboratory, note the following:
-
Ensure that the patient has at least one established intravenous access line, is receiving supplemental oxygen, and is connected to a cardiac monitor and continuous pulse oximetry. If time permits, placement of a nasogastric tube to decompress the stomach and decrease the risk of gastric perforation is strongly recommended.
-
Identify the anatomic landmarks (xiphoid process, 5th and 6th ribs, shown below) and select a site for needle insertion. The most commonly used sites are the left sternocostal margin or the subxiphoid approach.
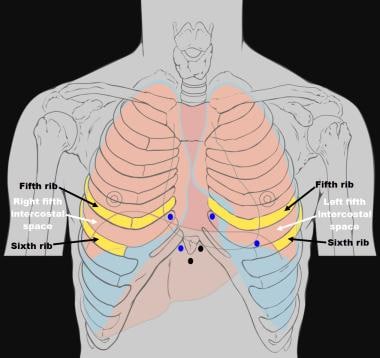 Pericardiocentesis. Pericardiocentesis needle insertion sites. The subxiphoid and the left sternocostal margin are the most commonly used sites (black dots). Adapted image from Wikimedia Commons/Patrick J Lynch, Medical Illustrator, and C Carl Jaffe, MD, Cardiologist.
-
Use the antiseptic solution to clean and surgically prepare the subxiphoid area. If time allows, put on sterile gloves, gown, and mask, and then apply sterile drapes to delineate the surgical site.
-
Infiltrate local anesthetic solution at the chosen site by first creating a skin wheal and then infiltrating the subcutaneous and deeper tissues.
-
Puncture the skin using a No. 11 blade scalpel at the chosen site (between the xiphoid process and the left sternocostal margin).
-
Connect a 20-mL or 60-mL syringe to the spinal needle, and aspirate 5 mL of normal saline into the syringe. While advancing the needle, the occasional injection of up to 1 mL of normal saline may ensure that the needle lumen remains patent. If time permits, connect an alligator clip from the base of the spinal needle to the V1 lead of an ECG machine.
-
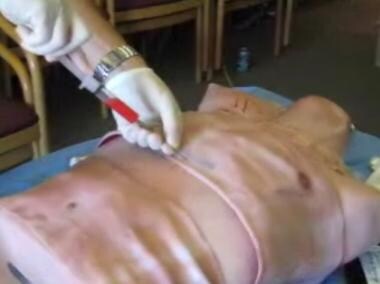
Insert the spinal needle through the skin incision and direct it toward the left shoulder. Maintain the needle at a 45-degree angle to the abdominal wall and 45 degrees off the midline sagittal plane as shown below. If time permits, needle insertion should be performed under direct ultrasonographic guidance.
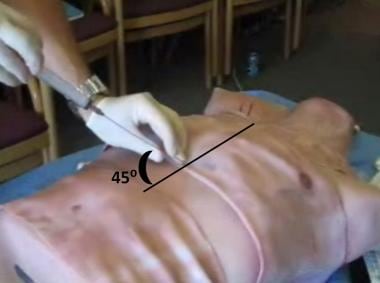 Pericardiocentesis. Needle insertion: Insert the spinal needle through the skin incision directed toward the left shoulder at a 45-degree angle to the abdominal wall and 45 degrees off the midline sagittal plane.
-
Slowly advance the spinal needle up to a depth of 5 cm, as shown below, while applying negative pressure on the syringe until a return of fluid is visualized, cardiac pulsations are felt, or an abrupt change in the ECG waveform is noted. If the ECG waveform shows an injury pattern (ST segment elevation), then slowly withdraw the needle until the pattern returns to normal, as this change in waveform suggests that the spinal needle is in direct contact with the myocardium.
 Pericardiocentesis. Needle insertion: Slowly advance the spinal needle up to a depth of 5 cm while applying negative pressure on the syringe until a return of fluid is visualized.
-
Withdraw as much fluid as possible; when the syringe is filled, stabilize the needle against the patient’s torso, remove the filled syringe, and replace it with another one. An alternative setup to replacing syringes is using a 3-way stopcock and intravenous tubing, which allows the physician to aspirate pericardial fluid into the syringe and, after turning the stopcock, eject the fluid into a basin or a collection bag. As pericardial fluid is aspirated, the needle may move closer to the heart, and if an injury pattern appears on the ECG waveform, then the needle should be slowly withdrawn.
-
Remove the needle when fluid can no longer be aspirated.


Fluoroscopic- or ultrasonographic-guided pericardiocentesis with placement of a pericardial drain
Note the following:
-
Ensure that the patient is sitting at 30-45° head elevation, which increases pooling of fluid toward the inferior and anterior surface, thus maximizing fluid drainage.
-
Select a site that is closest to the pericardial space, avoiding vital structures, such as the internal mammary artery, lungs, myocardium, liver, and vascular bundle at the inferior margin of each rib.
-
Shave the skin carefully to avoid any trauma. Anesthetize the local site with lidocaine (1-2%). Make a small incision (approximately 5 mm) to decrease the resistance during needle insertion. Separate the subcutaneous tissue with mosquito grasping forceps.
-
Connect the needle with a 3-way stopcock. Ensure that the syringe with 1% lidocaine is connected to the 3-way stopcock on the opposite side of the needle connection. Connect the transducer on the side of the 3-way stopcock. Attach a sterile ECG recorder to the metal part of the needle.
-
Insert the needle through the subxiphoid approach on the left side under fluoroscopy. Advance the needle and syringe until the needle tip is posterior to the rib cage. The needle should be advanced toward the shoulder at an angle 15-20° from the abdominal wall. While advancing the needle toward the pericardial space, aspirate the syringe and inject lidocaine for a better analgesic effect. Continue to advance the needle until fluid is aspirated in the syringe or the ECG monitor shows ST elevation.
-
Withdraw the needle slowly with negative pressure on the syringe if the ECG shows ST elevation after clearing the needle with lidocaine. Reinsert the needle in a different direction very slowly until fluid is aspirated in the syringe.
-
If hemorrhagic fluid is aspirated, a few milliliters of contrast medium are injected, which can be observed surrounding the cardiac silhouette, indicating that the needle tip is in the pericardial space. If the contrast material immediately disappears, then the needle is in one of the cardiac chambers.
-
The position of the needle is confirmed by injecting agitated saline through the needle, termed saline echocontrast medium, for confirmation of position. This procedure is particularly important when bloody fluid has been aspirated or when confirming the needle position. If contrast appears in the pericardial space, the procedure can be continued.
-
When the needle tip is inside the pericardial space, a soft floppy-tip guidewire is passed through the needle. Wrap this guidewire around the heart. Remove the needle, and insert a soft catheter with multiple side holes over this wire. Remove the guidewire. Connect the catheter hub with the transducer and syringe with a 3-way stopcock. Place the dressing and secure the catheter to prevent displacement. Ensure that the catheter is flushed with 1-2 mL of fluid to prevent blockage.
-
Two different types of catheters are commonly used: the pigtail catheter and the straight catheter. A pigtail catheter is curved and has a soft tip. A straight catheter has side holes that help to increase drainage and reduce the chances of blockage. The type of catheter selected depends on the surgeon's preference. A more flexible catheter that allows continuous drainage may be preferable.
-
The pericardial catheter can be left in the space for 24 hours with continuous closed drainage occurring, using gravity to increase drainage. The catheter should be removed after 24 hours, if possible, because it increases the chances of infection in the pericardial space. However, keeping the catheter in the pericardial space is often necessary to maintain drainage for longer periods. Negative suction should not be used to maximize the drainage.
-
Echocardiographic-guided procedure follows the same principles as the fluoroscopic-guided procedure. When echocardiography is used as the guide, the operator has more choices regarding the approach to the effusion. One of the most commonly used approaches is the apical approach, inserting the needle along the long axis and toward the aortic valve. In the echocardiographic-guided procedure, no contrast media is injected to the pericardium and instead the presence of the needle in the pericardial space can be confirmed by using air bubbles.
-
CT-guided pericardiocentesis is a relatively new approach that is indicated specifically for patients in whom ultrasonographic-guided or radiographic-guided pericardiocentesis is unsuccessful. For example, echocardiographic-guided procedures may have some technical difficulties in obese patients.
-
The pericardiocentesis (even the echocardiographic-guided procedure) is recommended to be performed in a cardiac catheterization laboratory where appropriate equipment is available for hemodynamic monitoring and interventions, except under the most urgent conditions.
-
Pericardiocentesis with intrapericardial sclerotherapy is also effective in treating patients with malignant pericardial effusion.
Pericardiocentesis with fluoroscopy also appears to be an effective alternative method to treat postoperative pericardial effusion with accurate localization of the catheter in challenging situations, such as when contrast echocardiography may not be efficient due to surgical artefacts and pulmonary problems. [14]
Pearls
Confirmation of pericardial versus intracardiac needle tip placement
Various techniques have been described, but none is more reliable than real-time, direct ultrasonographic guidance. Note the following:
-
Clotting: Intracardiac blood forms a clot, whereas pericardial aspirate should not form a clot.
-
Hematocrit or hemoglobin measurement: The pericardial aspirate should have a lower hemoglobin concentration than the patient’s peripheral blood.
-
Fluorescein test: Intracardiac injection of fluorescein should cause a fluorescent flush on examination of the eyelid’s conjunctiva.
Seldinger technique
When patients with large pericardial effusions present in extremis due to the development of tamponade physiology, consider placing an indwelling pericardial catheter in order to allow further aspiration of fluid and to "buy time" if such patients cannot be taken to the operating room in a timely fashion.
Various commercial pericardiocentesis kits using the Seldinger technique exist. Review of the kit and its specific instructions is highly recommended prior to attempting placement.
The technique is similar to that of placing a central venous catheter. It is imperative to know that the needle tip is within the pericardial space and not within the heart before passing the guidewire and inserting the dilator. Ultrasonographic guidance, as shown below, is highly recommended.
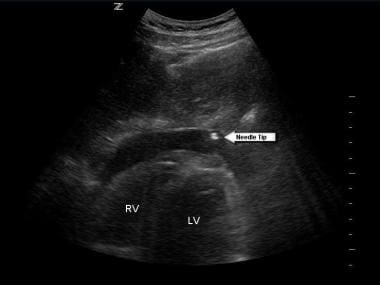 Pericardiocentesis. Subxiphoid view of the heart demonstrating the needle tip within the pericardial space.
For a video discussion on emergency pericardiocentesis, the reader is encouraged to see Fitch MT, Nicks BA, Pariyadath M, McGinnis HD, Manthey DE. Videos in clinical medicine. Emergency pericardiocentesis. N Engl J Med. Mar 22 2012;366(12):e17. [QxMD MEDLINE Link]. Available at: http://www.nejm.org/doi/full/10.1056/NEJMvcm0907841. Accessed July 26, 2019. [15]
Complications
Potenitally serious complications can occur with pericariocentesis, [16] with rates varying between 4% and 40%. [17, 18, 19] Such complications include the following:
-
Dysrhythmias
-
Coronary artery puncture or aneurysm
-
Left internal mammary artery puncture or aneurysm
-
Pneumopericardium
-
Hepatic injury
-
False-negative aspiration – Clotted blood in the pericardium
-
False-positive aspiration – Intracardiac aspiration
-
Reaccumulation of pericardial fluid
-
Pericardiocentesis. Subxiphoid view of the heart demonstrating a large pericardial effusion.
-
Pericardiocentesis. Needle insertion: Insert the spinal needle through the skin incision directed toward the left shoulder at a 45-degree angle to the abdominal wall and 45 degrees off the midline sagittal plane.
-
Pericardiocentesis. Needle insertion: Slowly advance the spinal needle up to a depth of 5 cm while applying negative pressure on the syringe until a return of fluid is visualized.
-
Pericardiocentesis. Subxiphoid view of the heart demonstrating a moderate sized pericardial effusion.
-
Pericardiocentesis. Subxiphoid view of the heart demonstrating the needle tip within the pericardial space.
-
Pericardiocentesis.Cine loop depicting subxiphoid cardiac tamponade. Video courtesy of Meghan Kelly Herbst, MD. Also courtesy of Yale School of Medicine, Emergency Medicine.
-
Pericardiocentesis. Pericardiocentesis needle insertion sites. The subxiphoid and the left sternocostal margin are the most commonly used sites (black dots). Adapted image from Wikimedia Commons/Patrick J Lynch, Medical Illustrator, and C Carl Jaffe, MD, Cardiologist.


