Practice Essentials
As compared to comprehensive imaging performed in the radiology department, emergency ultrasonography is a bedside diagnostic modality that answers time-sensitive specific questions about a patient’s condition. Emergency ultrasonography is diagnostic, can be used to assess clinical response in ongoing resuscitations, and can help guide invasive procedures. It directly influences patient management decisions and interventions in multiple ways. In terms of diagnosis, emergency ultrasonography can answer time-sensitive life-saving questions such as the following: Does this 70-year-old man with low back pain have an abdominal aortic aneurysm? Does this 19-year-old assault victim have intraperitoneal bleeding?
Bedside ultrasonography is indicated in the evaluation of symptoms such as the following:
-
Abdominal pain
-
Flank pain
-
Low back pain
-
Blunt abdominal trauma [1]
-
Hematuria
-
Unexplained hypotension
It is also indicated in the workup of specific abdominal disease entities such as the following:
-
Abdominal aortic aneurysm [2]
-
Acute cholecystitis
-
Biliary colic
-
Acute appendicitis
-
Nephrolithiasis
-
Urinary retention
Newer applications include use of abdominal ultrasonography as a procedural aid (eg, in paracentesis, in abscess drainage), [3] for evaluation and monitoring of central venous filling as a surrogate for central venous pressure, and for assessment of abdominal wall pathology (eg, abscess, hernia).
When emergent treatments such as intravenous fluids or blood transfusion are indicated, performance of abdominal sonography should not delay initiation of these treatments.
Although ongoing resuscitation and extremis are not contraindications, abdominal sonography can be challenging to perform in such situations.
Anesthesia is generally not necessary for abdominal sonography; however, pain management should not be delayed, and patients may experience some discomfort due to probe pressure. For improved patient comfort, consider using warmed ultrasound-conducting gel, if available.
Ultrasound imaging does not use ionizing radiation and has not been shown to be associated with genetic damage or oncogenesis.
Tissue damage secondary to heat production when Doppler imaging is used is a theoretical risk, so high-energy modes typically are avoided with fetal ultrasonography.
As both ultrasound technology and the training to use such technology improve, new clinical applications and indications for use in the emergency department (ED) will continue to grow. New and investigational applications of abdominal ultrasound include the following:
-
Use of sonographic contrast agents to improve assessment of solid organ injuries in trauma patients
Contrast-enhanced ultrasound (CEUS) has been suggested as offering an alternative to CT in stable children with blunt abdominal trauma. In a systematic review by Pegoraro et al, it was reported that the range of sensitivity and specificity for CEUS was 85.7-100% and 89-100%, respectively. [6]
CT has long been the gold standard for diagnosing suspected small-bowel obstruction (SBO). Some studies are comparing point-of-care ultrasound (POCUS) with CT imaging in the diagnosis of SBO. A POCUS-first approach to SBO could lead to a reduced need for advanced imaging, decreased ED length of stay, and reduced patient exposure to radiation. However, clinical decision tools are needed to allow clinicians to better identify which patients would benefit most from CT imaging for SBO in the ED. [7]
Ultrasonography has been shown to have a high sensitivity and specificity for diagnosing ureter stones by identifying hydronephrosis. In a study by Kim et al, ED length of stay associated with real colic was significantly lower in patients who underwent ultrasonography than in those who underwent conventional workup (151-194 min vs. mean 234 min). [8]
Ultrasonography is recommended as first-line imaging for appendicitis in children. A study by Kasmire et al showed that pediatric patients who received point-of-care ultrasonography had a significantly shorter mean length of stay (274 min) in the pediatric ED than those who did not (317 min). [9] In a meta-analysis of 17 studies of POCUS for acute appendicitis, pooled sensitivity was 84% and specificity 91%; pediatric sensitivity was 95% and specificity 95%. [10]
In a study by Tyler et al of ultrasonography to diagnose the presence of appendicitis in adults in the ED, of 174 patients, 25 of 25 patients with a positive US had appendicitis, 32 of 146 with indeterminate US had appendicitis, and 0 of 3 with a negative US had appendicitis. [11]
Guidelines
Guidelines on gastrointestinal ultrasound by the European Federation of Societies for Ultrasound in Medicine and Biology include the following [12] :
-
For a complete examination of the bowel, both a low-resolution probe and a high-resolution probe are needed.
-
A probe with a frequency greater than 5 MHz should be used when wall thickness is measured.
-
Color Doppler imaging should be used to evaluate the vascularization of pathologic bowel wall.
-
CEUS of the bowel can be used to separate vascular from avascular intestinal or peri-intestinal lesions, including abscesses.
-
Ultrasound elastography can be used to evaluate the stiffness of pathologic thickened bowel.
-
Standard examination of the intestine does not require specific preparation.
-
Fasting longer than 6 hours is recommended before splanchnic blood flow is measured.
-
Overnight fasting is recommended before gastrointestinal motility is assessed.
-
Bowel wall thickness < 2 mm (not the cutoff value for pathology) could be considered normal when measurement is performed in the normal filling state, except in the duodenal bulb and the rectum.
-
Bowel wall thickness should be measured perpendicular to the wall from the interface between the serosa and the proper muscle and the interface between the mucosa and the lumen.
-
A resistive index in the superior mesenteric artery between 0.80 and 0.89 should be considered normal.
-
Peak systolic velocity of the superior mesenteric artery (SMA) between 80 and 220 cm/sec should be considered normal.
-
Transabdominal ultrasound can be used to assess normal bowel anatomy, vascularization, and luminal width.
-
The anatomic location of the bowel, peristalsis, and luminal content can be assessed by gastrointestinal ultrasound.
Technique
Equipment for abdominal bedside ultrasonography includes the following:
-
Ultrasound machine with color flow Doppler and power Doppler
-
Low-frequency (2-5 MHz) curvilinear transducer
-
Acoustic coupling gel
-
Gloves
-
Appropriate materials to drape the patient
Patients should be evaluated in the supine position but can be moved to the lateral decubitus position for improved visualization of particular structures (eg, gallbladder).
Male patients should have the entire abdomen exposed for the examination. Take care with female patients to minimize exposure of sensitive areas.
General considerations
With bedside ultrasound, a few scanning conventions merit brief discussion. Primarily by convention, the ultrasound probe marker is oriented in 1 of 2 directions. The probe indicator should be oriented toward the patient's head, or toward the patient's right side. Further, the dot on the screen, which corresponds to the ultrasound probe indicator, should be placed on screen-right to maintain consistency of images. These conventions facilitate standardization of image appearance on the ultrasound screen. However, one should be aware of differing conventions for probe marker placement and for dot screen location, which vary by specialty.
FAST examination
Clinical questions, probe selection, elements of the focused assessment with sonography in trauma (FAST) examination, patient positioning, and limitations of the FAST examination are discussed below. This discussion is organized by indication.
The American Institute of Ultrasound in Medicine (AIUM) in collaboration with the American College of Emergency Physicians published guidelines on performance of FAST. They noted that FAST is a proven procedure for evaluation of the torso for bleeding after traumatic injury, particularly blunt trauma, but that it may also be helpful in penetrating injury. FAST has evolved to include assessments of the peritoneal cavity and analysis of the pericardium and pleural spaces for hemorrhage, particularly in cases of chest trauma. [13]
These guidelines note, however, that FAST has some limitations, such as the following [13] :
-
Limited ability to detect free fluid in some injured children; in patients with mesenteric, diaphragmatic, or hollow viscous injury; and in patients with isolated penetrating injury to the peritoneum.
-
Limitations in identifying retroperitoneal hemorrhage.
-
Limitations in pericardial assessment for hemopericardium, including pericardial fat pads, cysts, and preexisting pericardial fluid.
Blunt or penetrating abdominal trauma
FAST examination is nearly 100% sensitive for detecting clinically significant hemoperitoneum [14] and, as such, has largely replaced diagnostic peritoneal lavage (DPL) for assessing for intraperitoneal free fluid. It is important to remember that ultrasound is screening for the presence of free fluid and is not a reliable tool for visualizing the actual injury (such as liver or spleen laceration, especially in adults).
By Advanced Trauma Life Support (ATLS) protocol, the FAST examination is performed immediately after the primary survey. In hypotensive patients, it is nearly perfect for identifying intraperitoneal bleeding requiring emergent laparotomy and cardiac injury/pericardial effusion in penetrating trauma.
CT remains the diagnostic test of choice for hemodynamically stable patients with suspected intra-abdominal injury, although serial abdominal examinations and serial FAST examinations have been used as alternative means of ruling out significant injury in low-risk patients. These alternative approaches have gained proliferation in some centers at a time of rising concern regarding radiation exposure from CT, responsibly embodied in the principles of ALARA (As Low As Reasonably Achievable), which are increasingly called for by multiple organizations.
Clinical questions
-
Is free intraperitoneal fluid present?
-
Is a pericardial effusion present?
Probe selection
-
A low-frequency (2.0-5.0 MHz) curvilinear probe or small curved array or phased array probe (1.0-4.0 MHz) can be used for adequate tissue penetration.
-
A small curved array or a phased array probe offers the benefits of a small footprint and easier imaging between rib spaces.
Elements of the FAST examination
Four standard views are obtained to look for free fluid (black, or anechoic, on ultrasound).
(See the image below.)
 Image of the Morison pouch (arrows) demonstrating a small layer of dark free intraperitoneal fluid (F). Also noted is free fluid wrapping around the inferior margin of the liver.
The first view is the right upper quadrant view , which emonstrates fluid in Morison's pouch (hepatorenal recess), classically taught as the most sensitive area for free intraperitoneal fluid.
(See the images below.)
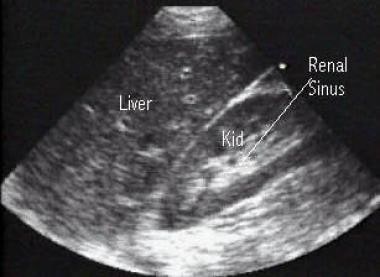 Right upper quadrant (RUQ) view of the Morison pouch (potential space between the liver and right kidney) where intraperitoneal fluid accumulates. This RUQ image depicts the liver and kidney (Kid). The center of the normal kidney (renal sinus) contains dense echoes.
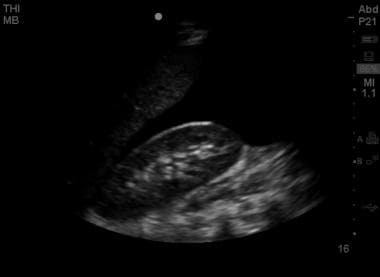 A marked amount of free intraperitoneal fluid in the Morison pouch, visible as a broad anechoic (black) signal between the liver edge and the anterior right kidney.
The second view is the left upper quadrant view, whcih emonstrates fluid in the splenorenal recess, in the subdiaphragmatic space, and along the inferior tip of the spleen and the inferior pole of the left kidney.
(See the image below.)
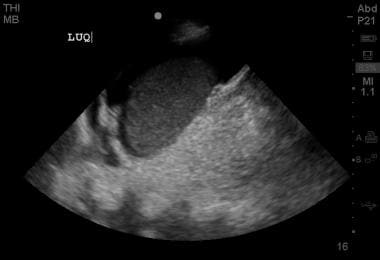 Positive left upper quadrant view on FAST examination, demonstrating perisplenic free fluid in the subdiaphragmatic space.
The third view is the subxiphoid view, whcih demonstrates pericardial fluid accumulations. A parasternal view may be obtained through the chest wall at the junction of the ribs and the sternum in patients with poor subxiphoid views or in those who cannot tolerate this view because of abdominal tenderness.
(See the image below.)
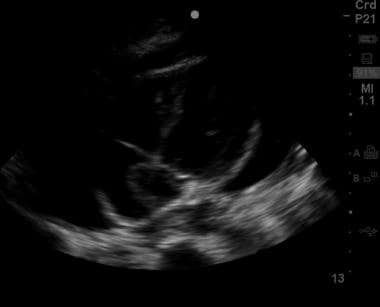 Subxiphoid view of the heart showing a moderate amount of pericardial fluid extending almost entirely around the cardiac silhouette.
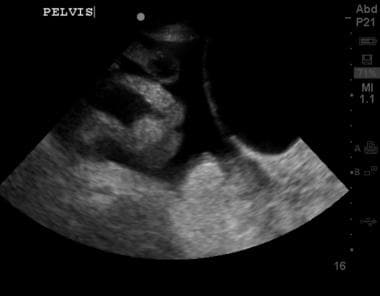
The fourth view is the suprapubic view, which emonstrates free fluid in the pelvis. Small amounts of free fluid can be physiologic in women of childbearing age.
(See the image below.)
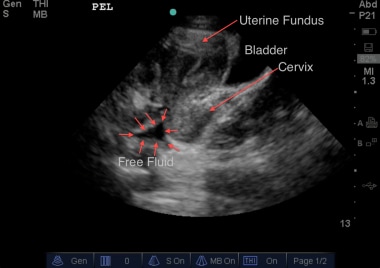 Sagittal view of the pelvis of a female patient. Deep to the uterus, wedge-shaped intraperitoneal free fluid can be seen. Courtesy of Stanford University Ultrasound Division with editing by Joshua Ennis, MD.
Patient positioning
The patient should be supine to allow fluid to collect in dependent areas. Rolling the patient immediately prior to the FAST examination may decrease sensitivity.
Placing the patient in the Trendelenburg position can increase the sensitivity of the right upper quadrant view for free fluid. [15]
Limitations of the FAST examination
Limitations include the following:
-
Inability to distinguish between blood, urine, bile, ascites, or other fluids
-
Poor sensitivity for bowel, diaphragmatic, solid organ injury, and retroperitoneal bleeding
-
May be limited in patients with large body habitus
-
Not reliable for identification of bleeding from a pelvic fracture source
Abdominal aortic aneurysm
Symptomatic abdominal aortic aneurysm (AAA) with hemodynamic instability is a true vascular emergency that requires prompt identification in the ED, where resuscitative efforts can be initiated.
Physical examination is insufficiently sensitive to rule out AAA in the absence of a pulsatile abdominal mass, whereas the sensitivity of bedside ED ultrasonography for detection of AAA ranges from 94 to 100%. [16, 17, 18, 19]
Although aneurysm rupture cannot be reliably detected on ultrasound, the presence of an AAA in the hemodynamically compromised patient requires emergent operative evaluation and should not be delayed in order to obtain more definitive imaging. The presence of the aneurysm alone is sufficient to obtain emergent consultation.
Clinical questions
-
Is an AAA present?
-
Is an iliac artery aneurysm present?
Probe selection
A standard 2.0-5.0 MHz curvilinear abdominal probe may be used to achieve adequate tissue penetration in most patients. A larger footprint probe (large curved) is often helpful to push bowel gas aside.
Decreasing the probe frequency may be useful in patients with larger body habitus.
Elements of the examination
The entire course of the abdominal aorta should be visualized in the transverse plane, from the xiphoid process down to the iliac bifurcation (usually at or near the umbilicus). The transverse plane gives a more reliable size estimation of the aorta than the longitudinal plane (because of the potential for tangential measuring error in the longitudinal plane).
The common iliac arteries, which usually arise around the level of the umbilicus, should also be evaluated for aneurysm after the aorta has been evaluated.
Longitudinal views should be obtained. Take care to scan laterally through the barrel of the vessel and to identify its widest diameter, as a "parasagittal" view may give a false negative measurement. Further, longitudinal scanning is important in identifying the much rarer saccular aneurysm.
AAA is typically defined as an aortic diameter >3.0 cm when measured anteriorly to posteriorly from outer wall to outer wall. Also considered an aneurysm is any increase in size with distal movement along the course of the aorta (even if < 3 cm).
Be sure to measure the entire aneurysm (including clot)—not just the false lumen often created by the presence of echogenic thrombi adherent to vessel walls. Measurement of this false lumen will lead to underestimation of aneurysm size.
Iliac artery aneurysm is defined as vessel diameter >1.5 cm when measured from outer wall to outer wall at its widest point.
(See the images below.)
 Short-axis view of an abdominal aortic aneurysm roughly 9 cm in transverse diameter. The hyperechoic vertebra is visible posteriorly and serves as a landmark in identifying the aorta. Though ultrasonography is an insensitive modality for evaluation of dissection and rupture, this image contains evidence of a false lumen, suggesting likely dissection.
Patient positioning and imaging tips
If bowel gas prevents adequate visualization when a midline approach is used, left lateral decubitus positioning and imaging through the liver may provide better visualization of the aorta.
Asking the patient to inspire deeply may assist in visualizing the proximal abdominal aorta, as diaphragmatic excursion pushes the liver inferiorly.
Holding firm pressure with a large footprint probe may help to displace bowel gas and improve visualization of the aorta. Often, displacing bowel can be further assisted by applying firm pressure with a second hand immediately adjacent to the probe.
In older patients, the aorta may take a tortuous path. Once the aorta is identified, follow it even if it goes off midline.
At times, the aorta can be seen from the coronal plane (midaxillary view), when the liver or spleen is used as the sonographic window. Increasing depth is necessary compared to FAST views. This is more useful as a "rule-in" tool rather than as a "rule-out" tool, as the aorta may not be visible in its full entirety; additional imaging modalities will be needed.
Saccular aneurysms (small aneurysm pouches) are easier to miss compared to fusiform aneurysms. It is critical that the entire aorta be visualized in 2 planes for assessment of AAA.
Tricks for identifying the aorta include the following:
-
Increase image depth and identify vertebral bodies by their characteristic hyperechoic appearance with posterior acoustic shadowing; the aorta should be immediately anterior and slightly to the patient's left of the echogenic vertebrae.
-
Do not mistake the spinal canal and the brightly walled superior mesenteric artery for the aorta.
-
Ask the patient to sniff; the inferior vena cava (IVC) often collapses during this maneuver, but the aorta typically does not.
-
You may also use color to help differentiate between IVC and aorta. When the transversely oriented probe is aimed up toward the head from the umbilicus, aortic blood is flowing toward the feet and, therefore, toward the probe. In this orientation, aortic flow will be red and IVC flow will be blue. These colors will reverse if the probe is pointed down toward the feet, so take care in using this technique. Also, the aorta will have pulsatile flow, whereas the IVC will have a more continuous hum of blood flow.
Limitations of ultrasonography in AAA evaluation
-
Ultrasonography has poor sensitivity for detecting aneurysmal leak or rupture.
-
If the aneurysm ruptures, bleeding is often retroperitoneal (rather than intraperitoneal) and thus cannot be well evaluated with ultrasonography; do not look for a positive FAST examination result. The presence of the aneurysm alone is sufficient to mobilize resources in the appropriate clinical setting.
-
Visualization of the aorta may be limited in the presence of bowel gas and in patients with large body habitus.
Inferior vena cava
Inferior vena cava (IVC) ultrasound has been widely adopted as a measure of intravascular volume status in the spontaneously breathing patient. [20, 21] It has been shown to grossly correlate with central venous pressure and may be considered a noninvasive surrogate for assessing volume status. Although IVC ultrasound may not predict fluid responsiveness, it is a decent marker for fluid tolerance of crystalloid resuscitation.
The most widely adopted measures include absolute IVC size and respirophasic variation known as the collapsibility index. These measurements allow one to estimate central venous pressure to help guide diagnostic workup and fluid resuscitation (both upon initial evaluation and over time).
Clinical questions
-
What is absolute IVC diameter?
-
How much respiratory variation is seen in the IVC diameter?
Probe selection
A standard 2 to 5 MHz curvilinear abdominal probe may be used to achieve adequate tissue penetration in most patients. A larger footprint probe (large curved) is often helpful in pushing bowel gas aside.
Decreasing the probe frequency may be useful in patients with larger body habitus.
Elements of the examination
Visualization of the IVC is usually accomplished by using the liver as an acoustic window in the right upper quadrant and following the IVC as it courses through the liver and into the right atrium. If this cannot be done, an alternative is an axillary transhepatic approach.
The IVC is usually identified in the longitudinal axis, with slow fanning side-to-side, to identify its maximal dimension. It may also be observed in the transverse plane.
Measurements are taken 1-2 cm distal to the junction of the hepatic veins and the IVC.
M-mode can be used to assist in measuring maximal dimension and respiratory variation.
Ask the patient to sniff; the IVC often collapses during this maneuver, but the aorta typically does not.
Correlations can be made between IVC size and central venous pressure, as follows:
-
IVC size less than 1.5 cm, with respiratory change at total collapse: central venous pressure is 0-5 cm water.
-
IVC size 1.5 cm, with respiratory change at greater than 50%: central venous pressure is 6-10 cm water.
-
IVC size 1.5-2.5 cm, with respiratory change at less than 50%: central venous pressure is 11-15 cm water.
-
IVC size greater than 2.5 cm, with respiratory change at less than 50%: central venous pressure is 16-20 cm water.
-
IVC size greater than 2.5 cm, with no respiratory change: central venous pressure is greater than 20 cm water.
(See the image below.)
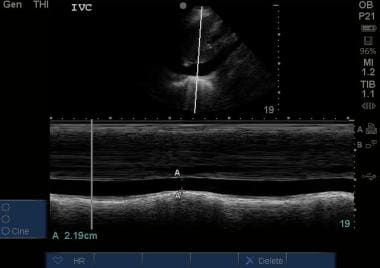 M-mode of an inferior vena cave (IVC) measured 2 cm distal to the confluence of hepatic veins with the IVC. In this image, the nadir measures 2.19 cm and minimally varies with respirations, consistent with an elevated central venous pressure. Courtesy of Stanford University Ultrasound Division with editing by Joshua Ennis, MD.
Patient positioning and imaging tips
If bowel gas prevents adequate visualization through a midline approach, a transhepatic axillary view is an alternative.
Holding firm pressure with a large footprint probe may help to displace bowel gas and improve visualization of the IVC.
Tricks for identifying the IVC include (1) asking the patient to sniff, as the IVC often collapses during this maneuver, but the aorta typically does not; (2) using color to help differentiate between IVC and aorta, because when the transversely oriented probe is aimed up toward the head from the umbilicus, aortic blood is flowing toward the feet and, therefore, toward the probe; in this orientation, aortic flow is red and IVC flow is blue; these colors reverse if the probe is pointed down toward the feet, so take care in using this technique; and (3) noting that the aorta has pulsatile flow, whereas the IVC has a more continuous hum of blood flow.
Limitations of ultrasonography in IVC evaluation
IVC measurements referenced above do not apply to patients receiving positive-pressure ventilation.
Findings must be interpreted within their respective clinical context/scenario. For example, a large/plethoric IVC may not necessarily be indicative of intravascular volume overload, but rather of cardiac tamponade or mitral stenosis, among others.
Visualization of the IVC may be limited in the presence of bowel gas and in patients with large body habitus.
Biliary tract
Right upper quadrant or epigastric discomfort and pain or tenderness are the primary indications for bedside biliary ultrasonography.
Patients with jaundice may benefit from bedside biliary ultrasonography; however, the ability of novice or untrained sonographers to interpret findings is limited. Further studies may be indicated.
Clinical questions
-
Are gallstones present?
-
Is evidence of cholecystitis present?
-
Is the common bile duct (CBD) dilated?
Probe selection
A small or large curved array probe of low or intermediate frequency (2.0-5.0 MHz) will suffice.
Probes with smaller footprints allow for easier imaging through rib spaces. Probes with larger footprints offer better abdominal views. Either type is acceptable.
Elements of the examination
The normal gallbladder appears on ultrasound as a pear-shaped, hypoechoic structure.
Find the gallbladder in the right upper quadrant, and scan through it in both transverse and longitudinal axes. This may require an intercostal approach between the ribs with the liver used as an acoustic window, or it may require a subcostal approach.
Interrogate the gallbladder while looking for gallstones, which are hyperechoic with associated posterior acoustic shadowing (darkened area deep to the stone). Be sure to visualize the neck of the gallbladder, as symptomatic gallstones can be found impacted in the neck.
(See the images below.)
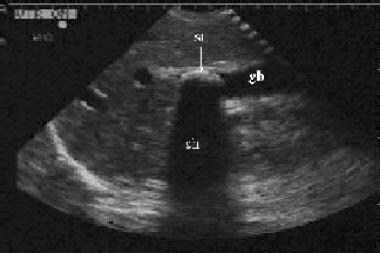 Longitudinal view of the gallbladder (gb) revealing a large gallstone (st) with associated acoustic shadowing (sh). This gallstone is located near the neck of the gallbladder. If impacted, it would need to be surgically removed.
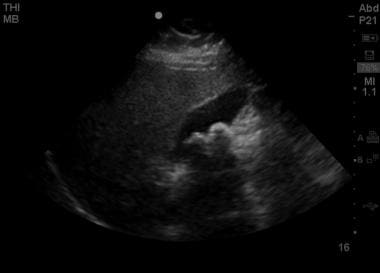 Longitudinal view of the gallbladder with 2 large stones visible in the fundus, with associated posterior acoustic shadowing. Notably, the anterior wall does not appear to be thickened and no evidence of pericholecystic fluid is present.
Measure the anterior wall of the gallbladder (often easiest on a longitudinal view). Wall thickness greater than 3 mm is considered abnormal and is called thickened. Avoid measuring the posterior wall of the gallbladder, as posterior acoustic enhancement makes this challenging and can lead to incorrect values.
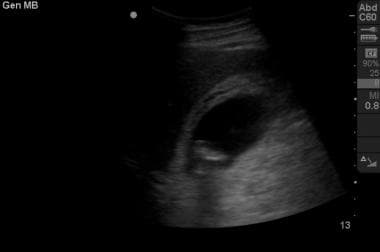 Right upper quadrant view of the gallbladder in longitudinal section reveals hyperechoic material in the fundus. Note the posterior shadowing consistent with cholelithiasis. In addition, the anterior gallbladder wall appears thickened, and the presence of a narrow stripe of hypoechoic fluid along the anterior wall suggests inflammation consistent with cholecystitis.
Assess for a sonographic Murphy sign. Reproduction of the patient’s abdominal pain when the ultrasound probe is pressed over the gallbladder constitutes a positive finding.
Look for a hypoechoic rim of pericholecystic fluid adjacent to the gallbladder. Pericholecystic fluid can provide evidence of inflammation due to gallbladder disease but can also be secondary to hepatitis or congestive heart failure.
Although individual findings on biliary ultrasound have insufficient sensitivity and specificity, the combination of multiple findings offers improved predictive value. A normal emergency physician–performed bedside ultrasound has a negative predictive value (NPV) of 90% for acute cholecystitis. [22] The combination of gallstones and anterior gallbladder wall thickening has a positive predictive value (PPV) greater than 95% for acute cholecystitis. [23] The combination of gallstones and a sonographic Murphy sign has a PPV of 92% for acute cholecystitis. [23]
Identify the common bile duct (CBD). This hypoechoic, tubular structure anterior to the portal vein can be visualized near the neck of the gallbladder in a longitudinal view or in a transverse view from the epigastrium. Following the main lobar fissure away from the gallbladder sometimes proves useful.
(See the image below.)
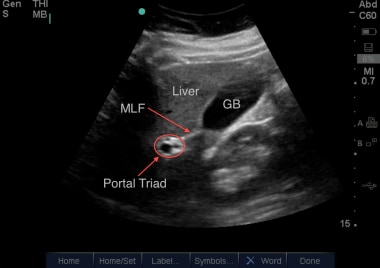 Here can be seen the gallbladder (GB) with the main lobar fissure (MLF) coursing down towards the portal triad. Lack of flow with color Doppler applied over the portal triad would confirm the common bile duct (CBD). Courtesy of Stanford University Ultrasound Division with editing by Joshua Ennis, MD.
Measure the CBD from inner wall to inner wall. CBD diameter greater than 5 mm is considered abnormal, though this cutoff increases with advancing age (a good rule of thumb is for every decade over 50 years, an additional 1 mm is allowed; eg, 6 mm at 60 yr, 7 mm at 70 yr). Patients often have a nonpathologic dilated CBD (up to 1 cm) after cholecystectomy. CBD dilatation provides evidence of extrahepatic biliary obstruction, either intraductal (eg, stones) or secondary to extrinsic compression (eg, tumor), and may warrant additional imaging (CT or magnetic resonance cholangiopancreatography [MRCP]) or GI evaluation and management via endoscopic retrograde cholangiopancreatography (ERCP).
Novice ultrasonographers often struggle in finding and identifying the CBD. In a patient with otherwise normal laboratory studies and an otherwise normal bedside biliary ultrasound, finding the CBD by bedside ultrasound in an emergency setting may not actually be necessary for low-risk scenarios according to a recent retrospective chart review, although this approach likely requires prospective validation prior to widespread adoption. [24]
Patient positioning and imaging tips
Supine positioning is the typical starting point, but the gallbladder is quite variable in its position and may be difficult to visualize. Improved views of the gallbladder may be obtained with the patient in a sitting position or in a left lateral decubitus position. Both of these positions bring the gallbladder out from beneath the costal margin. Asking the patient to take and hold a deep breath may bring the gallbladder farther down and into view.
To find the gallbladder, use the following 2 landmarks: (1) the portal triad (portal vein, common bile duct, and hepatic artery) and (2) the main lobar fissure. The gallbladder lies within the main lobar fissure (hyperechoic line), is the functional division between the right half and the left half of the liver, and is present and seen in most patients.
Imaging through the liver from the midanterior axillary line to locate the gallbladder and then moving the probe over it can prove helpful.
If the gallbladder proves difficult to visualize despite patient positioning and inspiration, consider repeating the exam after keeping the patient NPO for a period of time.
If uncertain whether gallbladder contents represent stones (eg, posterior acoustic shadowing is not seen), try repositioning the patient; stones generally shift to dependent areas, whereas polyps or masses remain stationary. Gallbladder sludge appears hyperechoic but does not result in acoustic shadowing and does layer or move dependently with patient positioning.
A gallbladder full of stones may result in the wall-echo-shadow (WES) sign, whereby the anterior gallbladder wall is seen with a hyperechoic stripe just behind and with broad, dark shadowing posteriorly. The WES sign can easily be confused with acoustic scatter caused by adjacent small bowel.
Limitations of bedside biliary ultrasonography
Biliary ultrasonography can be challenging (in particular, assessment of the CBD) and, thus, can be operator dependent.
The gallbladder can be difficult to visualize in nonfasting patients.
The finding of gallstones does not by itself explain the patient's symptoms. Although gallstones place patients at increased risk for biliary disease, they can be and often are asymptomatic.
Renal
Ultrasonography is useful in evaluating patients with renal colic and has high sensitivity and specificity for diagnosing ureter stones by revealing hydronephrosis. In a study by Kim et al of patients in the ED because of renal colic, ED length of stay was significantly lower in the ultrasonography group than in the conventional group (mean 172 min; 151-194 min vs. mean 234 min). [8]
In a study of 413 patients by Sibley et al, PoCUS showed a specificity of 71.8% and a sensitivity of 77.1% for the presence of hydronephrosis in patients with suspected renal colic. [25]
Indications for renal ultrasonography include assessment for obstructive uropathy, as evidenced by hydronephrosis or bladder distention in the following settings:
-
Unilateral flank pain, low back pain, or lower abdominal pain
-
Hematuria
-
Anuria or decreased urinary output
An important cautionary note is that AAAs frequently present in a manner similar to renal colic, so bedside ultrasonography to assess for and rule out an AAA is indicated in at-risk populations. Hydronephrosis and even hematuria from an AAA adjacent to the ureter can occur, making it even more important to screen for both in at-risk groups.
Clinical questions
-
Is hydronephrosis present?
-
If hydronephrosis is present, is it unilateral or bilateral?
-
Is the bladder distended? Is urinary retention present?
Probe selection
A standard curvilinear abdominal probe (2.0-5.0 MHz) typically is the best choice.
Elements of the examination
Both kidneys should be interrogated in the transverse and longitudinal planes. The asymptomatic side should be scanned first to establish a baseline for comparison.
Normal ultrasound appearance of the renal parenchyma, from exterior to interior, is as follows:
-
Hyperechoic renal capsule
-
Hypoechoic renal cortex
-
Hypoechoic medullary pyramids
-
Hyperechoic renal pelvis
-
Assess for hydronephrosis. In hydronephrosis, the renal pelvis is dilated and is filled with dark anechoic fluid, seen coalescing centrally within the hyperechoic renal pelvis. Hydronephrosis generally is classified as mild, moderate, and severe. With increasing severity of hydronephrosis, the standard architecture of the kidneys becomes more abnormal, with compression of the cortex.
(See the images below.)
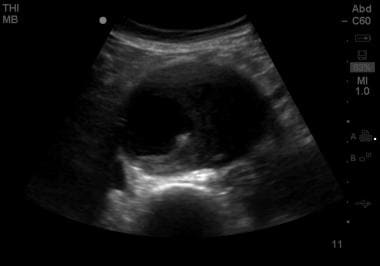
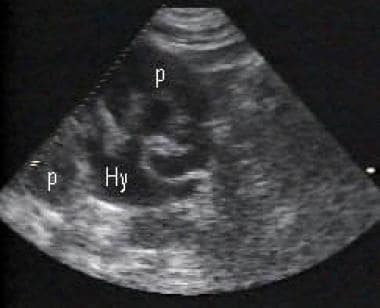 Image demonstrating moderate hydronephrosis (Hy) and the bear claw sign. Dilatation of the renal collecting system with extension into and splaying of the renal calyces is seen. Renal parenchyma (p).
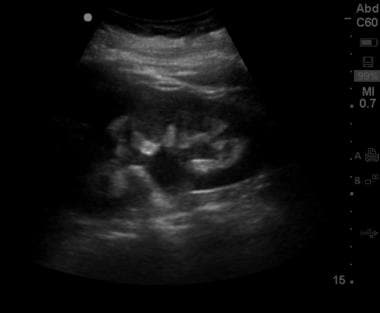 Moderate hydronephrosis, with dilatation of the collecting system and blunting of calyceal fornices. The thickness of renal parenchyma remains relatively intact.
Be sure to look for hydronephrosis in both kidneys, as bilateral hydronephrosis is indicative of more distal obstruction or dysfunction.
Mild hydronephrosis may be present in the absence of obstruction in patients who are pregnant or overhydrated. In these instances, the finding should be present bilaterally. A very full bladder would also suggest this.
Visualize the bladder in both transverse and sagittal planes. Bladder volume can be estimated by measuring its diameter in 3 perpendicular planes and by applying the formula 3/4 x (L x W x H). Controversy continues over the utility of assessing for ureteral jets in obstructive uropathy. [26] Assessing for ureteral jets can be somewhat time-consuming in a busy ED setting.
Patient positioning and imaging tips
Supine positioning is the typical starting point.
Asking the patient to take and hold a breath may be helpful, especially when one is trying to visualize the left kidney, which is more superior and posterior in the abdomen than the right kidney.
Right lateral decubitus positioning may further assist in visualizing the left kidney.
Limitations of renal and urinary ultrasonography
Renal stones are rarely directly seen (unless large and positioned in the proximal or distal ureter). Hydronephrosis is the surrogate marker for obstructing stones.
Hydroureter can be challenging to visualize on ultrasound unless significant hydroureter is present.
Hydronephrosis is a nonspecific finding that can be secondary to many causes, both intrinsic (eg, nephrolithiasis) or extrinsic (eg, pelvic mass).
Appendicitis
Indications of acute appendicitis include the presence of any of the typical signs and symptoms (ie, periumbilical or right lower quadrant abdominal pain or tenderness, abdominal rebound or guarding, fever, nausea and vomiting, or anorexia). Ultrasonography is recommended as first-line imaging for appendicitis in children. [9]
(See the images below.)
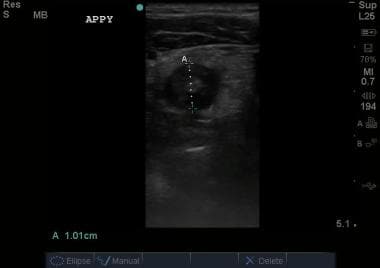 Transverse view of appendix. This image demonstrates an enlarged appendix, noncompressible in real time, consistent acute appendicitis. Courtesy of Stanford University Ultrasound Division with editing by Joshua Ennis, MD.
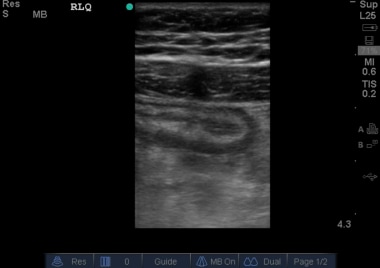 Appendix in longitudinal axis. This dilated blind-ending tubular structure measuring larger than 6 mm was not compressible in real time, consistent with acute appendicitis. Courtesy of Stanford University Ultrasound Division with editing by Joshua Ennis, MD.
Clinical questions
-
Is the appendix dilated?
-
Is the appendix compressible?
-
Is there lack of peristalsis in the appendix?
-
Is there a fecalith in the appendix?
Probe selection
A linear array probe of intermediate to high frequency (5.0-10.0 MHz), depending on the body habitus of the patient.
Elements of the examination
Begin scanning over the point of maximal pain, as indicated by the patient. This improves the accuracy of the examination. [27]
Search for the appendix by slowly and firmly compressing the abdomen with the linear probe at the point of maximal tenderness; slowly applied firm pressure may help displace overlying loops of bowel.
Move progressively through all quadrants until the appendix is located, or until a thorough abdominal survey has been completed.
It is often helpful to use the psoas muscle and the iliac vessels as a guide in locating the appendix.
Once the appendix is found, complete the following steps:
-
Visualize the appendix along its entire length in both short and long axes.
-
Measure the diameter of the appendix from external wall to external wall; a diameter >6 mm is considered abnormal.
-
Assess the compressibility of the appendix. An inflamed and swollen appendix does not compress under gradual compression.
-
Look for evidence of continued peristalsis. Normal peristalsis is impaired in the inflamed appendix. This may be better assessed with a long-axis view.
-
Examine the cross-sectional appearance of the appendix, as it takes on a multilaminar targetoid appearance in the setting of acute inflammation.
Patient positioning and imaging tips
Supine positioning is standard.
Limitations of the examination
Limited sensitivity of the examination renders it insufficient for ruling out acute appendicitis.
This is a technically challenging and time-consuming examination with significant interoperator variability.
The appendix is extremely difficult to visualize in the setting of perforation and in patients with large body habitus.
Of all the techniques discussed in this article, this is the most difficult. If suspicion for acute appendicitis remains high, further imaging, surgical consultation, or both are indicated.
Paracentesis
Paracentesis is a bedside procedure performed to obtain ascitic fluid from the peritoneum. [28] Indications for bedside ultrasonography in paracentesis include the following:
Bedside ultrasonography can give immediate information regarding the presence or absence of ascites because of its high sensitivity for free fluid. It is much more reliable than assessing for a fluid wave or shifting dullness on examination.
Bedside ultrasonography has high utility in patients with suspected spontaneous bacterial peritonitis (SBP). It is also helpful in patients who need a tap for therapeutic indications (eg, to decrease abdominal pain from distention, to help reduce compressive dyspnea due to abdominal distention).
Ultrasound-guided paracentesis enhances patient safety, especially as many patients also have a coagulopathy.
Clinical questions
-
Is ascites present?
-
Where are the largest pockets of fluid located?
-
What is the safest location for placement of the needle that clears vital organs (eg, liver, spleen, bladder, bowel)?
Probe selection
Use a 2.5-5.0 MHz probe similar to those used in the FAST and aorta applications above.
Elements of the examination
Run the probe over the abdomen, while evaluating for the most accessible large fluid pocket that also clears vital organs.
(See the image below.)
 Abdominal ultrasound showing ascites fluid (dark) surrounding loops of bowel, with a significant fluid pocket extending to a depth of around 9 cm.
Two approaches are used for ultrasound-guided paracentesis: static and dynamic, as follows:
-
Static approach: The site is marked, then the paracentesis procedure is performed in standard fashion. If this approach is used, the patient must not move between marking and performance of the procedure. Special note should also be made of the depth of fluid collection to estimate the depth of needle placement. In addition, the angle of the probe at the time of marking should be mirrored by the angle of the needle to re-create the conditions appropriately.
-
Dynamic approach: This approach includes real-time ultrasonographic guidance. The site may be marked, but after the patient is prepped and draped in the usual fashion, the probe is also placed in a sterile sheath (with gel between the probe and the sheath and with sterile gel on the outside of the sheath). The fluid pocket is re-evaluated in real time as the needle is placed under direct ultrasonographic visualization. Care should be taken to visualize the tip of the needle.
Pearls
Repositioning the patient or the probe is often the key to capturing otherwise difficult-to-obtain images. Some examples include the following:
-
Seated or left lateral decubitus positioning for biliary ultrasound.
-
Breath-holding on inspiration for visualizing the left kidney or gallbladder.
-
Imaging through the liver to visualize the gallbladder from the coronal approach when it is not easily seen anteriorly.
-
Mild Trendelenburg positioning to improve the sensitivity of the right upper quadrant view in the FAST examination.
Be familiar with relevant anatomy, and know how to distinguish sonographically similar structures (eg, have the patient sniff to distinguish the inferior vena cava [IVC] from the aorta, use vertebral bodies to locate the abdominal aorta).
Bedside emergency department ultrasonography is preferable to radiology department imaging in an unstable patient. However, in a stable patient, more definitive imaging (eg, CT) may be indicated.
-
Right upper quadrant (RUQ) view of the Morison pouch (potential space between the liver and right kidney) where intraperitoneal fluid accumulates. This RUQ image depicts the liver and kidney (Kid). The center of the normal kidney (renal sinus) contains dense echoes.
-
Image of the Morison pouch (arrows) demonstrating a small layer of dark free intraperitoneal fluid (F). Also noted is free fluid wrapping around the inferior margin of the liver.
-
Longitudinal view of the gallbladder (gb) revealing a large gallstone (st) with associated acoustic shadowing (sh). This gallstone is located near the neck of the gallbladder. If impacted, it would need to be surgically removed.
-
Image demonstrating moderate hydronephrosis (Hy) and the bear claw sign. Dilatation of the renal collecting system with extension into and splaying of the renal calyces is seen. Renal parenchyma (p).
-
Short-axis view of an abdominal aortic aneurysm roughly 9 cm in transverse diameter. The hyperechoic vertebra is visible posteriorly and serves as a landmark in identifying the aorta. Though ultrasonography is an insensitive modality for evaluation of dissection and rupture, this image contains evidence of a false lumen, suggesting likely dissection.
-
Abdominal ultrasound showing ascites fluid (dark) surrounding loops of bowel, with a significant fluid pocket extending to a depth of around 9 cm.
-
Subxiphoid view of the heart showing a moderate amount of pericardial fluid extending almost entirely around the cardiac silhouette.
-
Positive left upper quadrant view on FAST examination, demonstrating perisplenic free fluid in the subdiaphragmatic space.
-
A marked amount of free intraperitoneal fluid in the Morison pouch, visible as a broad anechoic (black) signal between the liver edge and the anterior right kidney.
-
Right upper quadrant view of the gallbladder in longitudinal section reveals hyperechoic material in the fundus. Note the posterior shadowing consistent with cholelithiasis. In addition, the anterior gallbladder wall appears thickened, and the presence of a narrow stripe of hypoechoic fluid along the anterior wall suggests inflammation consistent with cholecystitis.
-
Longitudinal view of the gallbladder with 2 large stones visible in the fundus, with associated posterior acoustic shadowing. Notably, the anterior wall does not appear to be thickened and no evidence of pericholecystic fluid is present.
-
Moderate hydronephrosis, with dilatation of the collecting system and blunting of calyceal fornices. The thickness of renal parenchyma remains relatively intact.
-
Sagittal view of the pelvis of a female patient. Deep to the uterus, wedge-shaped intraperitoneal free fluid can be seen. Courtesy of Stanford University Ultrasound Division with editing by Joshua Ennis, MD.
-
Appendix in longitudinal axis. This dilated blind-ending tubular structure measuring larger than 6 mm was not compressible in real time, consistent with acute appendicitis. Courtesy of Stanford University Ultrasound Division with editing by Joshua Ennis, MD.
-
Transverse view of appendix. This image demonstrates an enlarged appendix, noncompressible in real time, consistent acute appendicitis. Courtesy of Stanford University Ultrasound Division with editing by Joshua Ennis, MD.
-
Here can be seen the gallbladder (GB) with the main lobar fissure (MLF) coursing down towards the portal triad. Lack of flow with color Doppler applied over the portal triad would confirm the common bile duct (CBD). Courtesy of Stanford University Ultrasound Division with editing by Joshua Ennis, MD.
-
M-mode of an inferior vena cave (IVC) measured 2 cm distal to the confluence of hepatic veins with the IVC. In this image, the nadir measures 2.19 cm and minimally varies with respirations, consistent with an elevated central venous pressure. Courtesy of Stanford University Ultrasound Division with editing by Joshua Ennis, MD.
-
Color cine loop depicting abdominal aortic aneurysm (AAA). Video courtesy of Meghan Kelly Herbst, MD. Also courtesy of Yale School of Medicine, Emergency Medicine.
-
Cine loop of abdominal aortic aneurysm (AAA). Video courtesy of Meghan Kelly Herbst, MD. Also courtesy of Yale School of Medicine, Emergency Medicine.
-
Cine loop depicting renal hydronephrosis. Video courtesy of Meghan Kelly Herbst, MD. Also courtesy of Yale School of Medicine, Emergency Medicine.